|
| Mayer carb data which should help peo... |
| Author |
Message |
    
Andrew Menkart
Moderator
Username: andrew
Post Number: 911
Registered: 11-2001

| | Posted on Thursday, January 17, 2008 - 02:26 pm: | 


|
Mayer carburetor Air valve Data.
By Richard A. Day Jr.
Jan. 16 2008
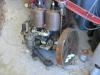
These photos and dimension should permit anyone reasonably skilled in the use of a metal working lathe to make adequate replacements for these too often missing parts of the air valve assembly, the valve, removable valve seat, retaining spring washer and spring for controlling the valve lift under operating conditions.
It should be noted the removable seat is a loose fit in the body of the carburetor. One could even say a sloppy fit. It is held in place by a loose fitting phosphor bronze spring washer. In my opinion almost any simple scheme which keeps the removable valve seat in place would suffice. In Fig. 1 the removable seat may be seen just protruding from the bottom of the air intake above the valve itself.
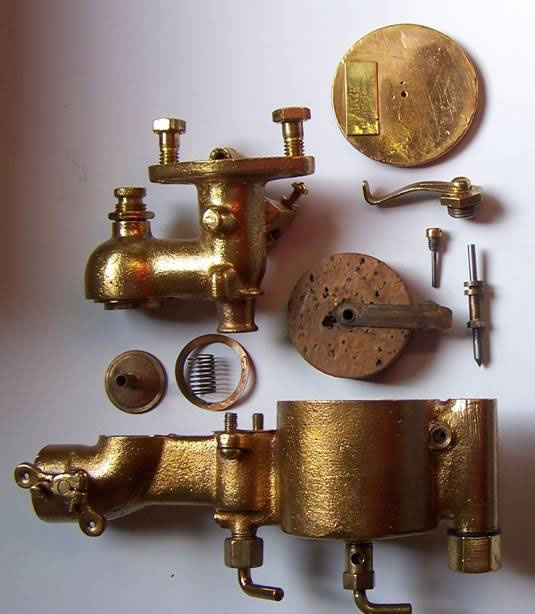
Fig 1
The air valve is shown in Fig.1 between the lower and upper carburetor main bodies. To its right is the air valve spring and the phosphor bronze spring washer. The air valve spring wire is phosphor bronze .025 size with nine turns approx .412” Diameter. One should note the air valve itself rests on a small seat insert with a spring washer retainer. These items are too often missing and without them the air valve has no seat to rest on.
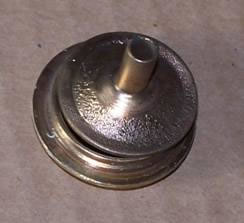
Fig 2. Air valve may have been a bronze casting. Dia. 1”
Height from finished face of valve .650”. OD at valve face 1” Thickness at rim of finished valve. 3/64”. Width of valve face 1/8”. OD. of shaft .217” Bore .160”
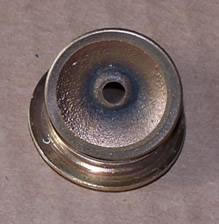
Fig 3. This shows the air valve bottom (Air intake side) sitting on the valve seat insert.
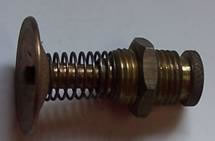
Fig. 4 Adjusting screw and spring assembly.
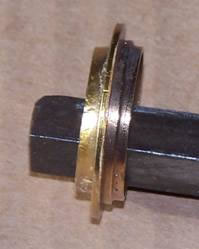
Fig. 5 Edge view of air valve insert. Seat on right. Note taper on the bottom or air inlet side seems to have no technical purpose unless it was to make rapid assembly in the factory. The overall width dimension of the valve seat insert is 19/64”. It does not appear to particularly critical on the lower or inlet air side from the lower body of the carburetor.
The width of this unit at it widest diameter is .050 There seems to be no great need for precision plus minus .005 should not be significant. In fact great precision in most dimensions is not a requirement from examining a number of these removable valve seats in my opinion. The one exception would be the valve seat on the right hand side of this photo should be reasonably true. The reason for the step down on the valve side of the removable seat is probably to limit the seat width with the valve itself which on used valves shows wear the same width as the seat. Note wear on Fig.3
The overall diameter of the removable valve insert at the widest point is approximately 1-3/16” again not a critical dimension.
The valve seat is approximately 1/8” from the upper face
The relieved portion of the valve seat from the face of the removable seat is approximately 1/16” This width does not appear to be significant.
The width of the valve seat is approximately 1/32”
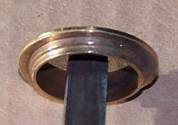
Fig. 6 valve seat side of insert.
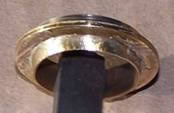
Fig. 7 air inlet side of insert. Note taper. Suggest precise taper is not critical or even if a taper is required. What is required is the spring washer have a sliding fit to push the insert into upper carburetor body.
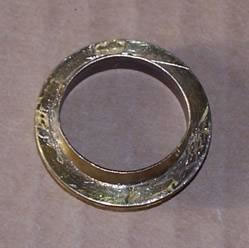
Fig. 8. Inlet face of air valve insert.
To hold the air inlet valve seat insert in the upper body a large phosphor Bronze .015 thickness spring washer with an OD of approximately 1.175 with an
ID of approximately .928”is inserted between the lower body and the inlet valve seat.
This is a quite a sloppy fit and the washer is simply bent to fill the gap left when the upper and lower bodies are screwed together.
Adjustment of the spring tension in this style carburetor really has to be done under working load with the throttle well open. For idle operation at shows etc. there really is no adjustment other than to make sure the air can flow at low throttle settings.
It takes a balance between needle valve and throttle setting to really adjust the lift when the engine is working. At least that is my experience. Hope these photos help.
Dick Day |
Roger DiRuscio
Senior Member
Username: solarrog
Post Number: 288
Registered: 03-2002
| | Posted on Thursday, January 17, 2008 - 02:45 pm: |
|
Talk to me about your cleaning process. was this blasted with walnut shell?. chemically cleaned? new old stock? how did you do this it looks great.
Roger |
Richard A. Day Jr.
Senior Member
Username: richardday
Post Number: 556
Registered: 11-2003

| | Posted on Thursday, January 17, 2008 - 05:29 pm: |
|
Not a NOS carb. No blasting, No chemical cleaning. 3 coats of clear polyurethane varnish, oil based not water based. Don't use it if you plan to run the engine. Gasoline quickly mess up the varnish.
I built a vented to outside buffing cabinet with a suction blower to remove dust. Same idea as a sand blast cabinet. The motor is 3/4hsp 220v 3600 RPM double shaft mounted out from the rear wall to give plenty of cleaence. I use rouge which comes in 1 and 2 pound blocks with 10" buffs Muslin one 1/2" thick and one 1" thick. I wear a paint spray mask as even with the vaccum vent outside the building very fine dust collects on the saftey glass window and the corrosion products etc. are toxic to breath. The items heat up and I wear heavy leather gloves be very careful the buff can grab an item and yank it out of you hands if you accidently get it position above the wheel. Learn carefully. I have a 2" thick foam pad under the buff to try to take the shock when I lose a piece. I routinly vaccuum the dust products with a built in system in the shop so it products also vent to atmosphere outside the building. The only time I use a wire wheel on bronze is to clean out knurling. In that case I use a 10" 1/2" wide wire wheel .006 wire to dig out the nurls. Never use on other surfaces. Clean the rouge binder by taking the parts outside and dipping in gasoline scrubbiing them with paint brush. Set in sun to dry outside. Then three washes in hot water with ordinary kitchen detergent. Thorougly rinse in hot water and then dry in the sun. Immeadiatly paint with first coat of varnish, wait at least 24 hours and then second coat and same wait third coat. Always handle parts with rubber gloves and don't handle until third coat is dry.
I have peices I did 20 years ago that look like new today. 20 years ago they didn't have poyurethane varnish so I used oil based clear varnish three coats. Darker than polyurethane clear is hence change. Don't ever touch the polished metal with your fingers or you will see them two years later under the varnish and that can be a problem to clean off and start over except the buffing is generally not so long.
I guess that is the quick one time course on brass polishing. |
D.L.McGregor
Visitor
| | Posted on Saturday, February 09, 2008 - 12:49 am: |
|
hi, i am an australian and i live in Mildura,Victoria, I have a Mayer carby in excellent condition,and i was wondering what its value is?? Thank you and i can be contacted on the posted address. |
Fred Seal
Visitor
| | Posted on Tuesday, November 18, 2008 - 12:05 pm: |
|
I have a mayer carburetor item. It looks like some kind of linkage. I is about 5 inches long has a 1/4" shaft and u-joint turning about 120 degrees ending with a 5/16" threaded cup on the end. It has a 1" hole in the side of it and the total thickness is about 1/2". It is made of bronze with the shaft being steel. Is it worth anything and what is it?
It does say mayer carburetor buffalo N.Y. |
dickiegibbens
Visitor
| | Posted on Wednesday, November 19, 2008 - 07:10 am: |
|
Fred's post is a close discrepttion of the plug valve on the inlet side of the Buick Schrebler carburator on my 1923 Buick. Selections are COLD, CHOKE, and HOT, marked on a rotary selector. Dykes Auto Manual gives this discreption in addition to throttle valves of the rotary type. |
Allen haywood
Visitor
| | Posted on Saturday, October 10, 2009 - 07:25 pm: |
|
I am missing the metering rod from the bottom center of a mayer. Does anybody produce these? |
|
|
|


|