| Author |
Message |
    
narrabay
Senior Member
Username: narrabay
Post Number: 52
Registered: 02-2016
| | Posted on Friday, April 01, 2016 - 03:41 pm: | 


|
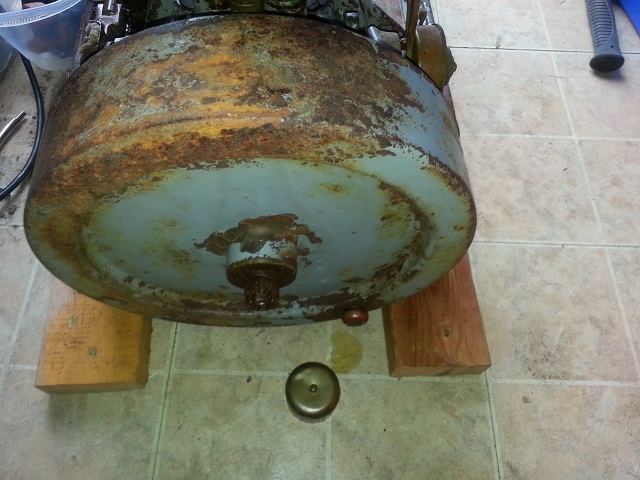
My flywheel is deeply pitted in places. I would like to have it reconditioned, blasted and repainted since it is a prominent part of the assembly.
There is one bolt in the center and no holes for a puller. Not even sure what the best procedure is. Looking for advice. Also, per a different issue, does anyone have a YT1 flywheel available I would like to buy another one to add a pulley, and keep the original just that, original.
Thank You this forum has been very helpful thus far.  |
narrabay
Senior Member
Username: narrabay
Post Number: 53
Registered: 02-2016
| | Posted on Friday, April 01, 2016 - 03:47 pm: |
|
 |
jb_castagnos
Senior Member
Username: jb_castagnos
Post Number: 1147
Registered: 07-2002

| | Posted on Friday, April 01, 2016 - 07:41 pm: |
|
Remove the castle nut and install a regular nut, leave it about 1/8" loose. use a large drift and hit it dead center and square with a heavy hammer, flywheel should jar loose. |
david_doyle
Advanced Member
Username: david_doyle
Post Number: 50
Registered: 03-2013
| | Posted on Friday, April 01, 2016 - 08:03 pm: |
|
I'd need a better reason to risk bending the crank then this. But then again I bent a crank doing something that did not need to be done so I am sensitive to the "if it aint broke" philosophy.
Worked out OK in the end and learned something about machine shop rates LOL.
Why not spin the engine and use some backed abrasives to prep it for paint and paint it in situ?
If it was mine I would mix molasses and water in a pan. Then I would place the engine so the fly wheel was submerged. In 2 weeks all that rust would be converted to a never rust again pleasant looking black oxide. The Original paint would be left and you'd have something that would look nice, preserve it patina and not rust in the future. Not my idea this is how museums all over the world preserve old iron.
What are you going to run off the pulley? Is it skookum to add a side load to the bearings? |
billschaller
Senior Member
Username: billschaller
Post Number: 645
Registered: 12-2003

| | Posted on Saturday, April 02, 2016 - 01:52 pm: |
|
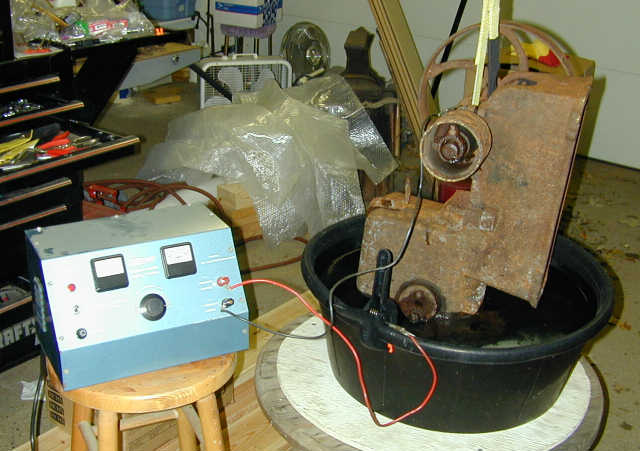
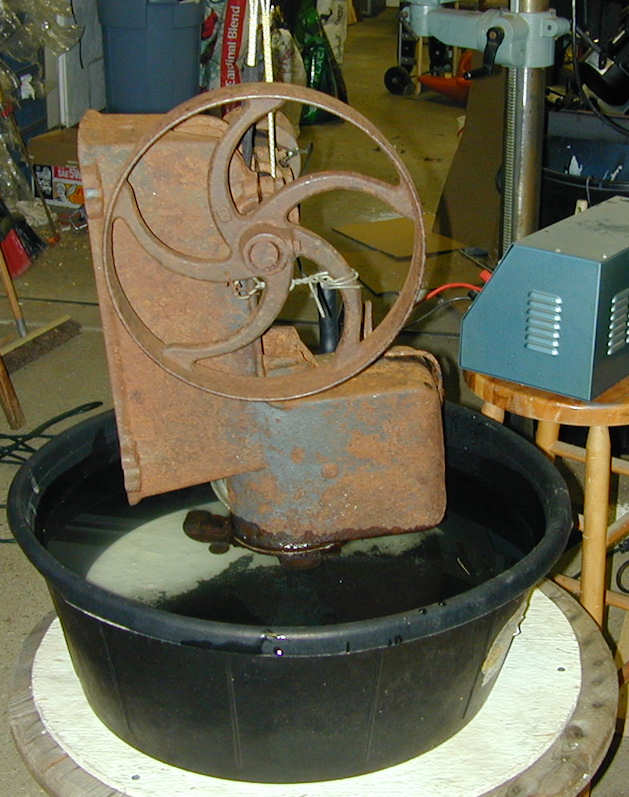
I had a Nelson with a very stuck head, put it in an electrolysis bath, and the nuts came off by hand. It had laid head down in a fence row for 50 years.
 |
robert
Senior Member
Username: robert
Post Number: 697
Registered: 07-2003
| | Posted on Saturday, April 02, 2016 - 02:33 pm: |
|
Your best option is probably a large hydraulic press since the crank will need to be pushed all the way through the hole in the flywheel. Support the flywheel on the opposing boss, not on the rim. You could warm it with a tiger torch first. Long and thorough soaking with penetrating oil is the first step though. You may have to make up a frame that will hold a porta-power cylinder since the engine would not fit between the frames of most hydraulic presses. You could try suspending the engine from a piece of pipe or wood flywheel down, held by two people and from a short distance "dropping" the end of the crank onto a piece of hardwood, but I wouldn't use anything harder than that. A pure copper drift and a lead hammer would another option. Of course you want to carefully check the projecting end of the crank with a fine flat file to ensure there are no burrs sticking up which could jam it as it goes through the flywheel. To use the copper drift and lead hammer (or just the lead hammer to start), you'd want to suspend the engine vertically, flywheel upwards, with bracing under the flywheel as close to the center as possible. |
narrabay
Senior Member
Username: narrabay
Post Number: 56
Registered: 02-2016
| | Posted on Saturday, April 02, 2016 - 02:49 pm: |
|
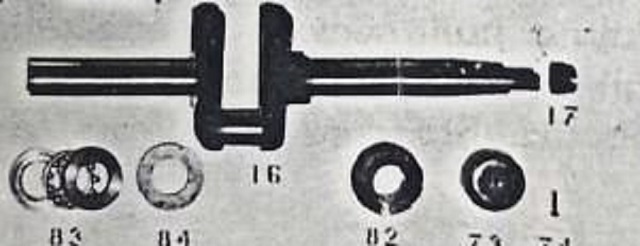
According to this picture of the YT parts, the crank appears tapered, That would make it way easier once free... can anyone confirm a taper on the flywheel end of the YT crank?
 |
narrabay
Senior Member
Username: narrabay
Post Number: 57
Registered: 02-2016
| | Posted on Saturday, April 02, 2016 - 03:13 pm: |
|
Also, what about heating the hub, cooling the shaft with spray refrigerant: (there is a screw hole right in the end of the shaft to discharge the refrigerant below into)
http://www.amazon.com/Hygenics-Endo-Ice-Refrigerant-Spray/dp/B004PI33DO/ref=sr_1 _4_a_it?ie=UTF8&qid=1459624294&sr=8-4&keywords=spray+refrigerant
I look forward to Ernie chiming in as to why this too is a bad idea! But we're here to learn, right? |
ernie
Senior Member
Username: ernie
Post Number: 2249
Registered: 01-2002
| | Posted on Saturday, April 02, 2016 - 03:59 pm: |
|
I am done chiming in |
narrabay
Senior Member
Username: narrabay
Post Number: 58
Registered: 02-2016
| | Posted on Saturday, April 02, 2016 - 08:27 pm: |
|
ernie your info is not only helpful to me but to future visitors with the same questions. We're not all with decades of experience, some of us are new. Just keep in kind that your posts help and thats what makes a good a forum. in any learning "there is no such thing as a stupid question". |
narrabay
Senior Member
Username: narrabay
Post Number: 75
Registered: 02-2016
| | Posted on Tuesday, April 19, 2016 - 01:49 pm: |
|
OK so this did not read a good conclusion. But the thread did produce good bits and pieces of info, such as do not heat an old flywheel, do not use a puller on the rim, and it *looks* like removing the flywheel and crankshaft together and in a hydraulic press with the flywheel supported at the inner boss, push the shaft through.
So, I am going to ask any experienced restorers here in this forum if that in fact is the least risky approach to separating an old flywheel from its shaft.
Thank You |
johnny
Senior Member
Username: johnny
Post Number: 561
Registered: 03-2006

| | Posted on Wednesday, April 20, 2016 - 08:07 am: |
|
I do the same thing JB does and never had a problem with it not working. You can use two jam nuts if your worried about boogering up the thread on the shaft. |
richardday
Senior Member
Username: richardday
Post Number: 1127
Registered: 11-2003

| | Posted on Wednesday, April 20, 2016 - 11:57 am: |
|
Read the notes on the YT-1 regarding the thread sizes for different editions of the engine. |
narrabay
Senior Member
Username: narrabay
Post Number: 76
Registered: 02-2016
| | Posted on Wednesday, April 20, 2016 - 02:54 pm: |
|
thanks rich, where can I find that info? my YT is a 1947... |
richardday
Senior Member
Username: richardday
Post Number: 1128
Registered: 11-2003
| | Posted on Wednesday, April 20, 2016 - 05:30 pm: |
|
Go to the serial numbers article I put on the page and you don't need to know the serial number there are some misc notes which apply across the board to to all the YT s. Note the different YT crankshaft threads for the flywheel retaining nut.
JB is right and you better follow his advice. Note the flywheel end has a tapered bore and the crankshaft fly wheel end is tapered. Never have encountered a straight shaft on a YT flywheel end. I tried to put tips on various Palmer models so you don't get tripped up when your Palmer is a little different from another one. Good luck. |
richardday
Senior Member
Username: richardday
Post Number: 1129
Registered: 11-2003
| | Posted on Thursday, April 21, 2016 - 07:10 pm: |
|
Palmer Engine Serial Number List is on the page go to it and read down to the YT section Note the nut thread details. etc. |
narrabay
Senior Member
Username: narrabay
Post Number: 80
Registered: 02-2016
| | Posted on Thursday, April 21, 2016 - 07:36 pm: |
|
Hi Rich, I did look at that and I think my 1947 would have the 1/2-13 nut. The info (which, thank you!) says they changed from 1/2-12 to 1/2-13 in 1936.
But is it left hand too? |
richardday
Senior Member
Username: richardday
Post Number: 1130
Registered: 11-2003
| | Posted on Friday, April 22, 2016 - 05:10 pm: |
|
I made the point some nuts are right hand and some are therefore left. You figure it out I don't have a clue which thread you have and I know of no Palmer document which makes that distinction by serial number or warning in their publications. Loosen the nut about a turn and Pull the flywheel forward and hold it there and then give the shaft a sharp rap with a drift which just clears the threaded portion of the nut. I just want to warn you tread lightly.
With a tapered crankshaft a sharp wrap should loosen it Don't mess up the cuff protector screw threads by not having a large enough drift. Make sure the drift you use just clears the threads of the retaining nut. Back off the retaining nut so it permits the flywheel hub to just move a few thou on the tapered shaft once it moves make sure the key-way is on the bottom. Find this position to avoid messing in up the key and key-way. Hope this helps. Regards, Dick Day |
narrabay
Senior Member
Username: narrabay
Post Number: 86
Registered: 02-2016
| | Posted on Friday, April 22, 2016 - 05:44 pm: |
|
rich thanks that is hugely helpful. there is enough thread showing that I can take a picture and look close and determine which way it went. interesting they swapped left and right threads on the same application turning the same way! |
narrabay
Senior Member
Username: narrabay
Post Number: 90
Registered: 02-2016
| | Posted on Friday, April 22, 2016 - 10:18 pm: |
|
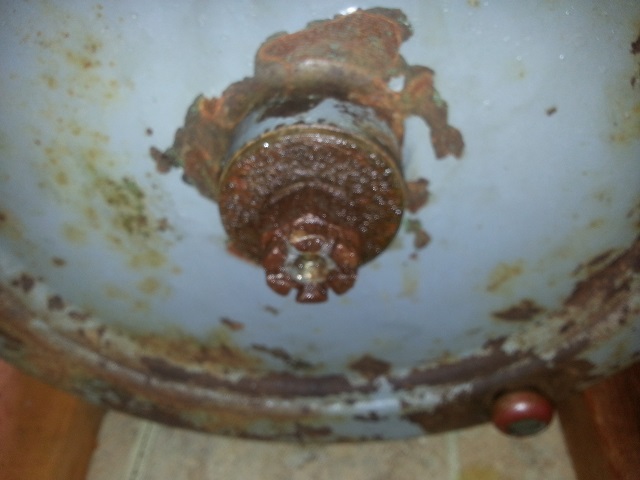
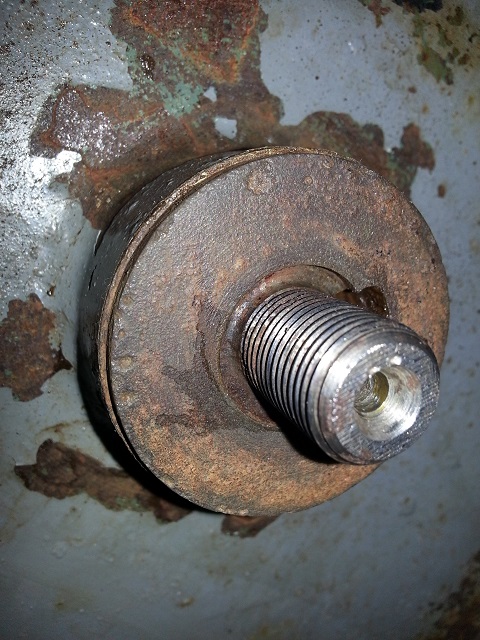
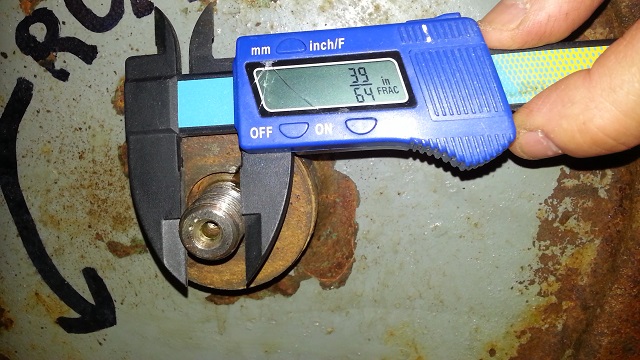
OK, the nut came off very easily (after a few days of applying PB which may have helped). The lock washer fell in half, no biggie.
The diameter is 5/8" and fine thread, right hand. It looks to me like a normal 5/8-18 Castle nut.
Now to find a drift with a <5/8" end.
   |
narrabay
Senior Member
Username: narrabay
Post Number: 93
Registered: 02-2016
| | Posted on Saturday, April 23, 2016 - 04:05 pm: |
|
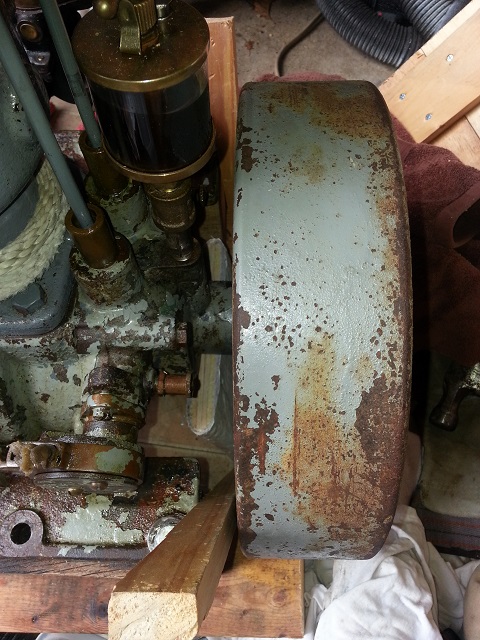
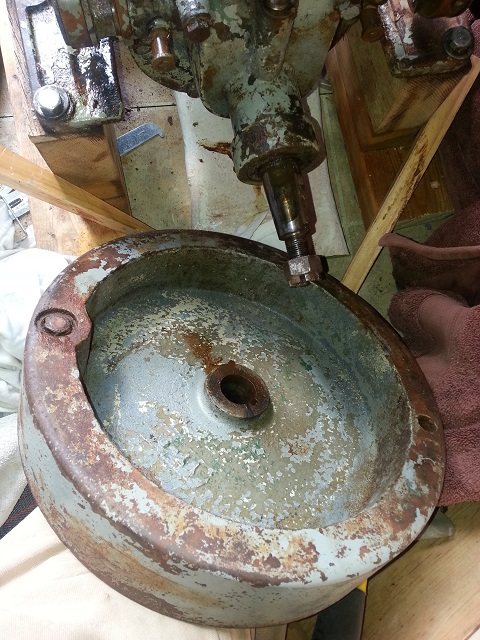
SUCCESS. I soaked the keyway etc with PB blaster every time I walked by. Had previously applied that in the rear gap as well. Noticing a 3/4" gap between the flywheel rim and the crank case, Made two wedges out of soft pine and *lightly* tapped them in to simulate hand pressure and protect the crank from the thrusts. Put the castle nut on about half way and gave it a few light raps with the hammer, flywheel popped off easy peasy. I was surprised how much the PB had penetrated. This is not a recommended procedure just what I did. Now I can have the flywheel dipped, lightly dressed and re-coated with gray epoxy paint to look like new. I may even disassemble and do the same for the crankcase halves and the transmission case (it needs a rear seal anyway). The cylinder and head look great so if I can match that paint color exactly, this motor will look like new.
  |
ernie
Senior Member
Username: ernie
Post Number: 2268
Registered: 01-2002
| | Posted on Saturday, April 23, 2016 - 06:47 pm: |
|
Plasticoat Ford Gray engine paint |
jb_castagnos
Senior Member
Username: jb_castagnos
Post Number: 1150
Registered: 07-2002
| | Posted on Saturday, April 23, 2016 - 08:56 pm: |
|
Guess if I can't get one off I'll try some PB Blaster. |
narrabay
Senior Member
Username: narrabay
Post Number: 94
Registered: 02-2016
| | Posted on Saturday, April 23, 2016 - 09:03 pm: |
|
jb seriously, I have looked into the use and information, that product has fantastic penetration. it's also an old product apparently since 1957. this is no hype, it really wicks into cracks very well. (despite the silly name)
http://www.amazon.com/Blaster-16-PB-Penetrating-Catalyst-oz/dp/B000I2079E |
jb_castagnos
Senior Member
Username: jb_castagnos
Post Number: 1151
Registered: 07-2002
| | Posted on Saturday, April 23, 2016 - 09:13 pm: |
|
That's why yours came off. Mine come off because I hit them with a hammer. |
ernie
Senior Member
Username: ernie
Post Number: 2269
Registered: 01-2002
| | Posted on Sunday, April 24, 2016 - 07:28 am: |
|
Narrabay's engine was totally rebuilt in the late 60s so that might have something to do with it coming off easily. |
jb_castagnos
Senior Member
Username: jb_castagnos
Post Number: 1152
Registered: 07-2002
| | Posted on Sunday, April 24, 2016 - 07:59 pm: |
|
I think it had to be the penetrant Ernie. I've been removing them for 50 years my way, I think if he had let it set a few more days it would have fallen off. I offered my advice right after he posted, several others advised against it. I've learned to be careful when offering advice and don't assume someone can do something because you can. A local collector asked me about removing a gibb key, I told him when possible I press the flywheel on, releasing the key, remove the key then remove the flywheel. He brought the 30" two cylinder crank to the shop with the flywheel on it, it looked like a snake. He tried to press the flywheel supporting it at the opposite end, I forgot to tell him I press against a plate behind the first throw. Common sense isn't always that common. |
admin
Board Administrator
Username: admin
Post Number: 45
Registered: 07-2001
| | Posted on Tuesday, May 03, 2016 - 09:13 am: |
|
I deleted some posts at the end of this thread. Thanks. |