| Author |
Message |
    
chris_spring
Senior Member
Username: chris_spring
Post Number: 178
Registered: 02-2019
| | Posted on Monday, December 20, 2021 - 01:54 pm: | 


|
Cue the eye rolls. I know I've been told that if it works don't mess with it, or that I'll fix it until it doesn't work, but here is one time I'm glad I paid no attention.
If you listen to the YouTube videos of this engine running, you will hear a pronounced mechanical clanking. Perhaps today I found the reason, and it is cause for concern.
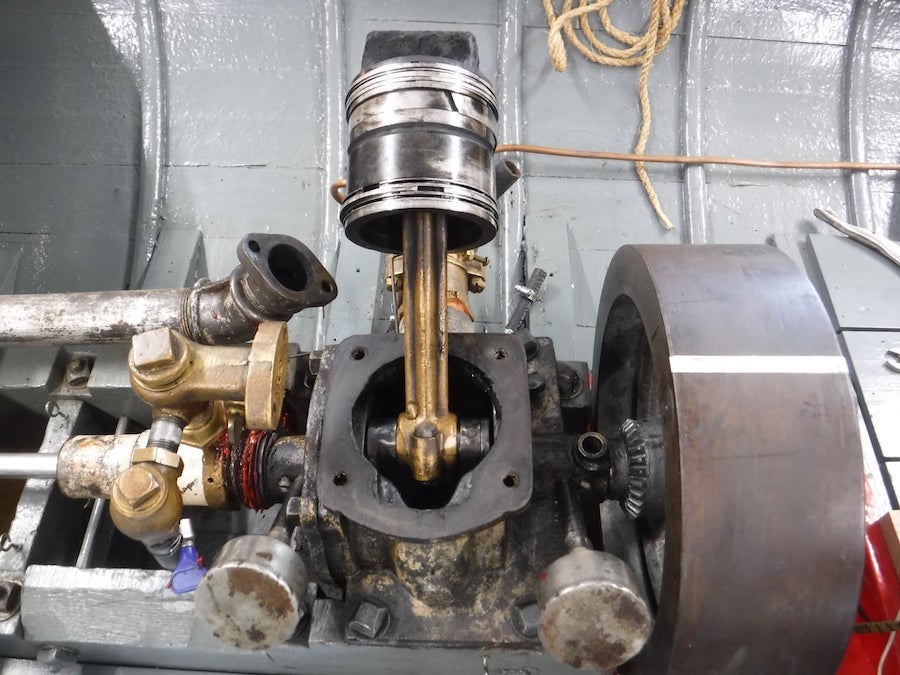
I pulled the cylinder on the Adams and found both good news and bad news. The good news is that as the cylinder came off, no parts fell out. The other good news is that the bad news may not be terrible.
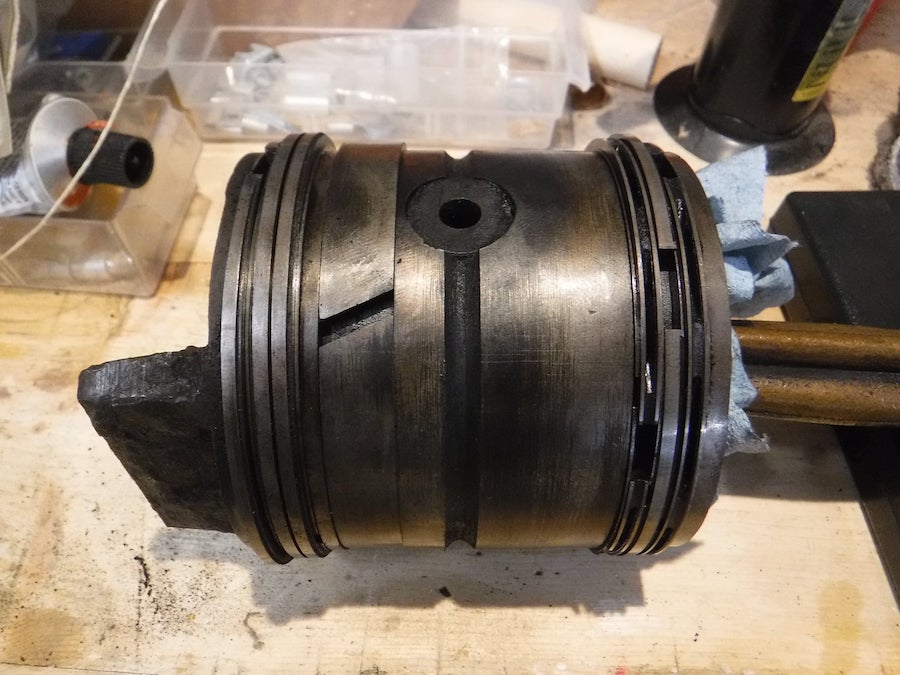
The cylinder itself for being 106 years old is in pretty good shape. A de-glazing will suffice. The piston also appears to be in good condition with no scoring.
The rings however could be another story. I have yet to get too deep into it but what we have is a stack of rings and spacers. There are likely 5 rings and 8 spacers. The side play appears to be excessive. There is a lot. I can measure how much later. That in itself likely causes the metallic clanking. I have an email in to Dave Reed at Ottos to see what he thinks and if he can help. The engine was running as was, so if nothing else it can go back together like that, but if there is an opportunity to fix it, I'd like to.
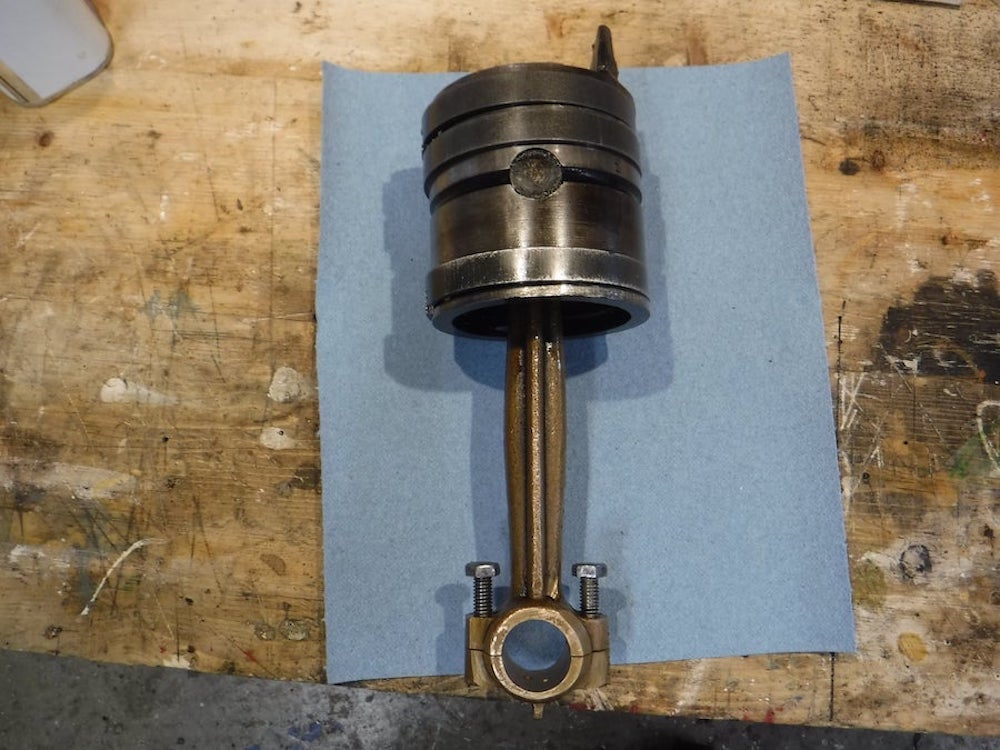
The bigger issue is the connecting rod big end. As you can see it is bronze. It has a lot of play. I had hoped it would have shims and I could simply remove them. No shims. I have an email in to my new bestest machinist to see if he can do something similar to what was done on the St. Lawrence. Until I hear back from these two, I'll do nothing.
If machinist buddy says ya, I'll take it, I'll undo the con rod and measure the journal. If there appears to be enough meet left, I'll get machinist buddy to skim the mating surface of the cap and con rod, then ream it.
None of this will come cheap if it is do-able at all. However, this is a historic and rare engine. If I can extend its operating life I'd certainly like to.
If any of you can give me the 101 on the ring arrangement you see here i'd appreciate it.
Cheers!
 |
chris_spring
Senior Member
Username: chris_spring
Post Number: 179
Registered: 02-2019
| | Posted on Monday, December 20, 2021 - 08:00 pm: |
|
The top set of rings comprise 4 compression rings and as I recall 6 spacers. The side play (gap in the lands) for the stack is .036.
The wide ring at centre has a side play or .006.
The bottom set comprises one compression ring and 2 scraper rings. It has a side play of .016.
Ideally, I'd like to fit a whole new set. The .036 thing is where I have a big ?
Cheers! |
miro
Senior Member
Username: miro
Post Number: 1172
Registered: 11-2001

| | Posted on Sunday, December 26, 2021 - 06:19 pm: |
|
One of the things to have, is a fairly large hole in the bearing cap on the big end to let the gas/oil mix provide the lubrication. A lot of engines had only a pin hole. Since the Adams is an early engine, I don't know if the makers knew about gas/oil mix.
That came into use about 1907-08 and by about 1910, it was in wide spread use.
Some of the makers would make a small pick up or dipper that would dip into the puddle of fuel that 2 cycle engines of that day had in the crankcase.
As for the gap in the top ring "assembly", yah, 35 thou is way to big. I recall that Gray engines of that era had really "tall" rings.
Richard D in Florida has a vast knowledge of Gray engines, and a pretty good restored collection too. He might be able to point you to a source . |
chris_spring
Senior Member
Username: chris_spring
Post Number: 180
Registered: 02-2019
| | Posted on Tuesday, December 28, 2021 - 08:18 am: |
|
Dave Reed has yet to get back to me. I'll leave it til the new year then call him. He might recommend the piston lands be machined to square them up, then new rings and oversize spacers installed. We'll see.
New bestest machinist buddy got back to me. He said he'd have a look at the con rod. On that basis I removed it from the engine. The crankshaft jounal does not appear to have any damage. The con rod obviously has wear but no scoring. The wrist pin appears to be fine. It is held in place with an allen set screw. I'm not about to mess with that.
The trick will be to get as accurate a measurement of the crankshaft journal diameter to provide machinist buddy. It appears to be nominally 1". I hope to hit Princess Auto shortly to buy micrometers. I'm not sure whether I need a 0-1" or a 1-2" micrometer, so I'll buy both. That way I have them. I haven't touched a micrometer in well over 40 years. As I recall I was never any good with them, so I've got some brushing up to do. I've tried to measure using digital calipers but I want to make sure I get this right.
It is my understanding that the oil gap for a 1" diameter journal should be about .010".
The con rod and cap have oil holes of adequate diameter. I don't see evidence of lubrication issues. I think that 25:1 fuel mix is a good choice. Thanks for that advice Miro.
In the bottom of the crankcase is a bit of residual oil. It is clean. I dipped into it quite extensively with a magnet and got no ferrous material to speak of. After 106 years, that's a positive sign. As well I can see no bronze residue.
I've been told that there were not very many of these engines made. Someone speculated as few as 25. I forget where I heard that. A quick look into the crankcase shows they were very crude. The counterweights are seperate pieces slid onto either end of the crankshaft. They flop around a bit unless under centrifugal force. Both they, and the crankshaft show tool marks where they have been ground I suspect in part to balance them. The grinding was rough and never polished.
A quick examination of the connecting rod and cap shows that my repair plan will likely work. If machinist buddy can skim say .015" off each surface, then ream it, that should do it. If not, it will certainly help.
I've read as much as I've found of Dave Reed's advice. At one point he recommends leaving cylinder honing to the professionals. If I want to clean up the cylinder bore, I should give it a quick pass by hand using emery paper.
I've got all winter to get this done, so I'm going to come at it slowly. The key is to do no harm.
I lay in bed last night thinking about it. I calculated that if I can get another 300 hrs out of this engine, I'll have gotten my use out of it.
Whether that is a realistic expectation, and I suspect it is not,remains to be seen.
Cheers! |
chris_spring
Senior Member
Username: chris_spring
Post Number: 182
Registered: 02-2019
| | Posted on Monday, January 03, 2022 - 11:09 am: |
|
And then it dawned on me.
I have yet to hear back from Dave Reed, but I think I may have solved the mystery with this unusual ring/spacer arrangement. It is not original.
I went back and measured the width of all three lands. They are the same.
Why someone found it necessary to remove the top and bottom rings will remain a mystery but my guess is that they replaced what was originally a ring like the one at centre, with what they had on hand. The combination they had available didn't stack up so to speak, hence the large side gaps.
I'll bet Dave will say all three rings should be the same. If that is the case, and if he can provide replacements, I may be back in business with little fuss.
Cheers!
 |
chris_spring
Senior Member
Username: chris_spring
Post Number: 183
Registered: 02-2019
| | Posted on Tuesday, January 04, 2022 - 07:39 am: |
|
I have now heard back from Dave. He asked that I send him a few measurements but he thinks 1/2" wide rings from a Palmer might fit. He agreed the current set up is a bodge job.
Many thanks to Dave. And many thanks to Roland Paddock who pointed me the right direction.
Cheers! |
narrabay2
Senior Member
Username: narrabay2
Post Number: 228
Registered: 10-2019
| | Posted on Saturday, January 08, 2022 - 07:20 pm: |
|
Sounds like the correct approach is being taken. If you mic the crank journal, check both ends and the middle and u can do what I did and back up that measurement with plastic guage which is cheap to buy.
Im no expert but .010" sounds really big for a bearing clearance... although maybe less important on a 2 stroke which Ernie taught me the bearing is always in downward compression
Nonetheless, I like my journals and their bearings in healthy smooth true condition.
How is the cylinder bore? |
chris_spring
Senior Member
Username: chris_spring
Post Number: 184
Registered: 02-2019
| | Posted on Monday, January 10, 2022 - 07:45 am: |
|
Ya. .010" might be a bit large. Dunno!
These days 4 stroke engines generally have a .001" clearance, but they are using modern, thinner, multi-grade oils, and turning a heck of a lot faster. high performance engines use a slightly larger clearance.
We'll see, but I would say likely nothing under.005" for this one. If nothing else that'll quiet it down.
The cylinder bore appears to be in good shape.
As I may have mentioned earlier, the goal is to get another 300 hrs out of it. Who knows if that is do-able?
Cheers! |
narrabay2
Senior Member
Username: narrabay2
Post Number: 231
Registered: 10-2019
| | Posted on Monday, January 10, 2022 - 12:13 pm: |
|
Heres more discussion (some of it VERY bad, some very reasonable sounding)
.001" per inch of journal diameter for oil
.002" per inch for grease
https://www.smokstak.com/forum/threads/bearing-clearances.68646/
I wouldnt go more than .003"
my 2 cents (USD)
if everything is right, why not 300 hours?  |
ernie
Senior Member
Username: ernie
Post Number: 2668
Registered: 01-2002
| | Posted on Tuesday, January 11, 2022 - 07:47 am: |
|
All,
Just remember it ran good the way it was.
I have seen many and I do mean many cases where someone took apart an old engine that ran good and rebuilt it to what some modern day machinist said were the proper tolerances.
The results were:
1 too tight to start easily or not at all
2 ran OK for a while and then had one or more of the following bearing problems
A bearing burnt out even with assumed proper lube
B main bearings ran hot even with assumed proper lube
I say assumed lube because the lub just wasn't getting in there.
C needed a pair of pliers to turn down the grease cups
One member that I personally know told me that he rebuilt a good running engine and it failed fairly quick. He said he looked over all the parts and thought well it ran good the way it was. All of his rebuilds since then have been on the pretty loose side of tolerances and they all start easily and run good for many years.
Now this being said the tolerances for rings need to be as follows.
Old cylinder with taper. Not sleeved or bored,
at the bottom of the bore .004 ring end gap per inch of bore. So a 3 inch bore should have .012 end gap. If it is a new bore the end gap should be the same everywhere. Ring side clearance needs to be less than .003 and the ring grooves need to be clean with straight sides.
A word of warning!
If it is a headless cylinder DO NOT EVER push the piston all the way to the top. If you do you may hear a snap as the rings expand into the combustion chamber. At that time there really isn't any way to get the piston out without physically damaging something.
As to lube from experience
Grease
Plain wheel bearing grease in any color from the local auto parts store. Never use Lubriplate.
Oil
2 strokes
30W non detergent 16 to 24 to 1 ratio
4 strokes
30W non detergent, however I have used 10/30 and 10/40 NON Synthetic with good results.
About the con rod bearing clearance. On a 2 stroke the con rod when running with no misfire is ALWAYS under compression. You will NOT hear a loose bearing when it is running.
One MFR McDuff didn't even use a con rod cap on their early engines. Just a strap to keep the con rod in place. The Gray that was in my fantail had a loose con rod because I screwed up when I put it together. It ran that way with no noise for years other than when you rocked the flywheel to start it.
Hope this helps
Ernie |
chris_spring
Senior Member
Username: chris_spring
Post Number: 185
Registered: 02-2019
| | Posted on Tuesday, January 11, 2022 - 10:42 am: |
|
Ernie.
That has been very helpful.
Thank you.
Cheers! |
narrabay2
Senior Member
Username: narrabay2
Post Number: 232
Registered: 10-2019
| | Posted on Tuesday, January 11, 2022 - 11:53 am: |
|
Hi Ernie that's great stuff a saver (I save stuff like that in a folder).
You didnt mention a rod bearing target, other than not too tight. If you had to pick a lower rod bearing clearance range, what would you shoot for as not too tight (especially) and also not too loose...
You should write a handbook and Im not kidding... |
ernie
Senior Member
Username: ernie
Post Number: 2670
Registered: 01-2002
| | Posted on Tuesday, January 11, 2022 - 07:11 pm: |
|
Acadia up in Nova Scotia said that on a brand new never been run engine just put the piston at TDC. Then just nudge the flywheel a little bit either way and is should now go to BDC. According to Stan Grayson that is how they checked them just before starting in the test house.
They were non counter weighted engines.
A counter weighted engine should pretty much stay where ever it is.
To answer your question I guess .003 to .005. I have never checked one. Just set it up so it felt right. Note I said guess.
Felt right you say...
Take out shims till it is stiff to turn.
Add a shim or 2 back as needed and it should be easy to turn. Make sure to check with full rotation/s. An easy way to check if the bearing journal is round with out measuring it.
This I learned from an old Ford mechanic. As in Model Ts etc
I just did a 2 HP Fairbanks Morse 2 flywheel farm engine this way on both the mains and rod. It turns and starts easily with no knocks when running. Grease cups turn down by hand and the bearings don't run hot.
Hope this helps
Ernie |
narrabay2
Senior Member
Username: narrabay2
Post Number: 233
Registered: 10-2019
| | Posted on Tuesday, January 11, 2022 - 10:39 pm: |
|
Very Cool Ernie this info from ur 2 posts should put Chris on the right track and he'll have another nice old engine... and who knows maybe me too if I ever get a fixer to work on someday... |
chris_spring
Senior Member
Username: chris_spring
Post Number: 186
Registered: 02-2019
| | Posted on Wednesday, January 12, 2022 - 06:55 pm: |
|
I spoke to Dave Reed today. What a guy. Dave is sending me a set of rings. He is surprised the lash up that was in there even worked.
I told him I'd run it for about 150 hrs. He said he figured I was a patient man. He figured that considering the job of the lower set of rings, and what was in there, there is no way that engine ran well.
My problem has always been that through my lack of experience with these type engines, I still have no idea what a good running engine should sound like, or what kind of reliability to expect.
That said, I'm optimistic that between new rings, a rebuilt ignition tower, and the Miro 2000 ignition system, I should get better consistency and reliability.
Now that Dave has resolved my ring issue, I'll take the con rod over to machinist buddy to get him to work his magic.
I have plans A and B in terms of how to repair that, but I will defer to him. And I'm pretty sure machinist buddy is the right guy for the job.
If I take Ernies advice wrt con rod clearance, I should be looking at a very different engine in terms of how it runs.
I started from having no clue. Now I have half a clue. Things are looking up.
I can't wait to hear the Adams run in 2022.
Cheers!
. |
chris_spring
Senior Member
Username: chris_spring
Post Number: 187
Registered: 02-2019
| | Posted on Sunday, January 23, 2022 - 12:30 pm: |
|
Rings arrived this week. As well, I dropped the con rod off at machinist buddy's. I may have it back this coming week.
In the meantime I'll touch up the cylinder with emery cloth as per Dave Reed, and adjust the ring end gaps.
The ignition timer is also at the machinists. He's going to do some work which should take some of the slop out of it.
Anyway, its all good.
Cheers!

 |
narrabay2
Senior Member
Username: narrabay2
Post Number: 235
Registered: 10-2019
| | Posted on Friday, January 28, 2022 - 12:33 am: |
|
Such wide rings. Amazing how things have evolved but at that time, no one was really sure what worked best I guess... |
chris_spring
Senior Member
Username: chris_spring
Post Number: 188
Registered: 02-2019
| | Posted on Friday, January 28, 2022 - 03:56 pm: |
|
Those rings cause a lot of drag. The cylinder is worn,being narrow at the bottom. In fact the rings would barely fit in. The trick then became one of setting the end gap in the area of the cylinder they will sweep.
Piston ring end gap conventional wisdom seems to suggest .004" per inch of bore. High performance engines use more. Given the mass of those rings I opted for .005" per inch of bore. I'm less concerned about blowby than I am of thermal expansion causing damage if the gap is too tight.
Machinist buddy wasn't able to remove all of the egg shape on the con rod. It still flops a bit. However, it is better than it was. I'll run it this year then check it again to see how quickly it is wearing.
He also overhauled the timer. Virtually all of the slop is gone.That, together with the Miro 2000 mod should help.
The next task is to re-install the con rod and cylinder. If I sense anything is amiss I'll stop to investigate.
When it comes to firing it up, I think I'll opt for a gentle break-in.
I can't wait to hear it. I've never heard it run without that metallic clanking. we now know what caused that.
Cheers! |
miro
Senior Member
Username: miro
Post Number: 1177
Registered: 11-2001
| | Posted on Saturday, January 29, 2022 - 05:27 pm: |
|
Limbering up the engine before firing it is a good idea.
I used a 1/3 HP electric motor with a small 1 1/2 in pulley on the Gray engine I worked on last summer.
I had to "help" the electric motor to get the engine rolling. Once running I sprayed (a lot) a mix of thin oil and hydraulic fluid into the intake port.
After the initial run ( 2-3 minutes I ran it for about 1 hour. That seems to clear a lot of the small schmutz .
Miro |
chris_spring
Senior Member
Username: chris_spring
Post Number: 189
Registered: 02-2019
| | Posted on Saturday, January 29, 2022 - 06:37 pm: |
|
The engine will definitely be limbered up prior to the first start. And as you suggested, the first run will be a couple of minutes only.
As you may know I have the original owners manual for the Adams. I find it interesting that they state that when new if the engine quits after a few minutes and cannot be turned over, leave it 10 minutes and try again. Repeat until the engine runs without quitting. No doubt a player in the quitting would be a ring thing.
Cheers! |
chris_spring
Senior Member
Username: chris_spring
Post Number: 190
Registered: 02-2019
| | Posted on Sunday, January 30, 2022 - 03:25 pm: |
|
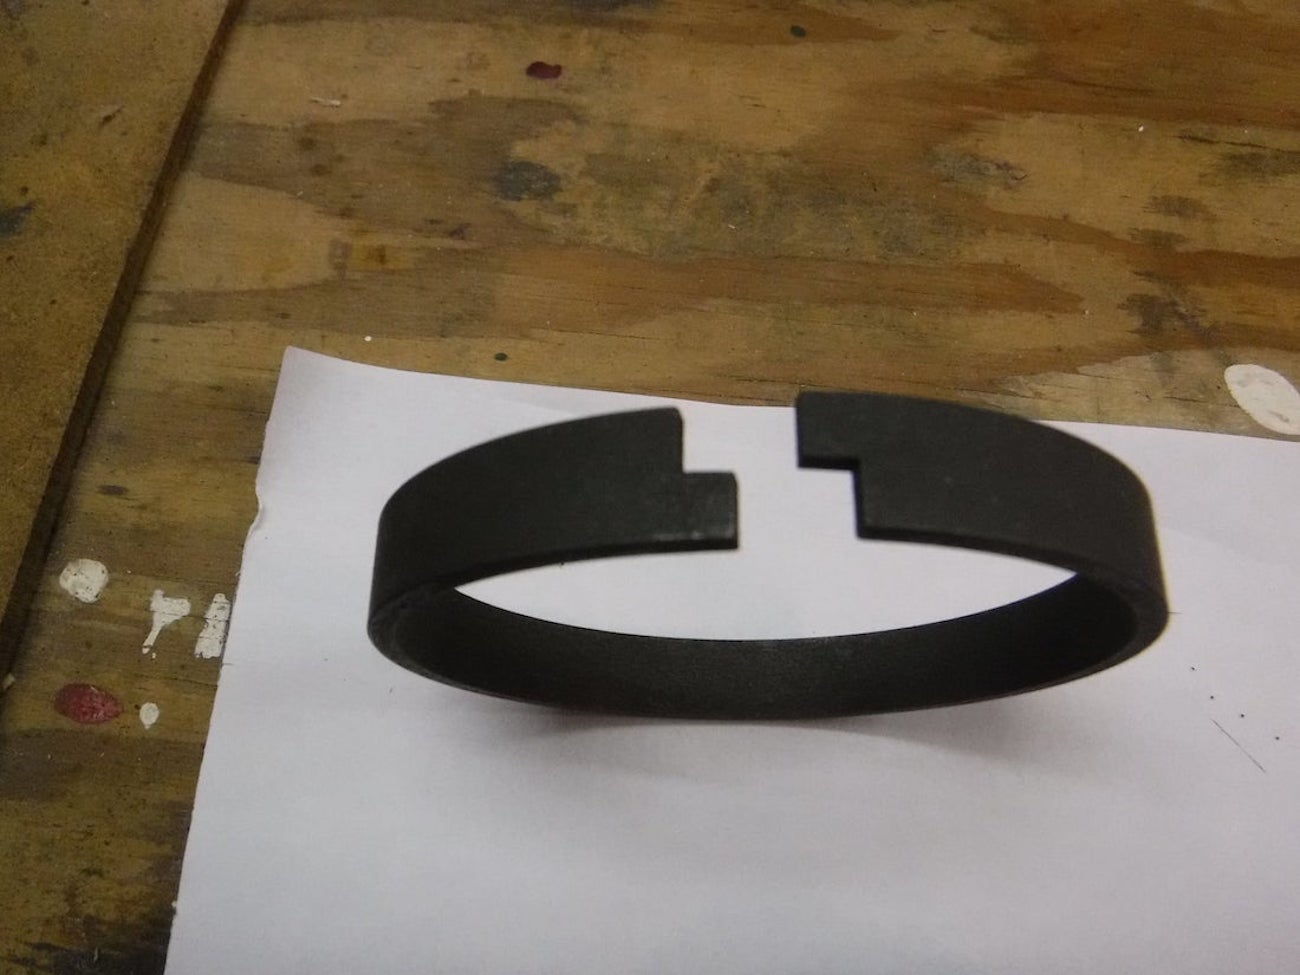
Here are a couole of pics, the lash up vs the new ring set. I now see how obvious the difference is.
I hope to start putting the engine back together tomorrow.
Cheers!
 |
narrabay2
Senior Member
Username: narrabay2
Post Number: 236
Registered: 10-2019
| | Posted on Sunday, January 30, 2022 - 10:56 pm: |
|
never mind, just realized the real setup is three fat compression rings... the other craziness was someone's doing from the past... now I get it duh!
Also, Chris what machine work was done? |
chris_spring
Senior Member
Username: chris_spring
Post Number: 191
Registered: 02-2019
| | Posted on Monday, January 31, 2022 - 07:35 am: |
|
The con rod big end was quite egg shaped. The con rod could be flopped side to side by quite a bit when attached to the journal. I figure it was out of round by at least .040". Machinist buddy took a bit off the mating surface between the rod and cap, then reamed the hole. Now there is perhaps .010" out of round. It is much better.
I now recall, that from the beginning, as I began to rotate the flywheel I could hear a slight clunk. I thought nothing of it. We'll see if that clunk is still there once it is back together. My guess is that it will not be.
Cheers! |
narrabay2
Senior Member
Username: narrabay2
Post Number: 237
Registered: 10-2019
| | Posted on Wednesday, February 02, 2022 - 05:20 pm: |
|
Hi Chris, Im sure it will be wayyy better. But I just wonder if he reamed the connecting rod hole, how could it be any out-of-round?
What does it use for a bearing? |
chris_spring
Senior Member
Username: chris_spring
Post Number: 192
Registered: 02-2019
| | Posted on Wednesday, February 02, 2022 - 09:20 pm: |
|
As you can see from the pic, the rod is bronze. Like the St. Lawrence, it has no bearing. The bronze itself provides the bearing surface. Trying to get the egg shape out of it was a trade off. I had anticipated the machinist would skim both mating surfaces of the con rod, then ream it. In order to be sure enough strength was left, he only skimmed one surface, then reamed it. Because the con rod didn't have even wear laterally, one end was slightly more egg shaped than the other. The upshot is that there is part the reamer didn't get. I'm Ok with that actually. I can monitor wear. There is enough meat left that if necesary it can perhaps be built up with braze then reamed, or babbitted next time. Then again, if the wear rate is low, further repairs may not be necessary.
The engine is now back together. I've rolled it over a few times. There was lots of sucking and whooshing going on, more than before. I'm no longer concerned about how much drag there seemed to be on the rings. That said, I'll still limber it up and break it in gently come spring.
Cheers! |