| Author |
Message |
    
jb_castagnos
Senior Member
Username: jb_castagnos
Post Number: 739
Registered: 07-2002

| | Posted on Sunday, December 02, 2012 - 09:49 pm: | 


|
I bought a crankshaft grinder in the spring, finally got to try it. Below is a link to the story on Harry's Page, it's a pain reducing all of the pictures.
http://www.smokstak.com/forum/showthread.php?t=112752 |
rbprice
Senior Member
Username: rbprice
Post Number: 411
Registered: 11-2001

| | Posted on Monday, December 03, 2012 - 07:43 pm: |
|
JB- did you completely fill the old keyway and then grind and re-mill the keyway?
As usual, a wonderful workman like job.
Thanks for sharing. |
jb_castagnos
Senior Member
Username: jb_castagnos
Post Number: 740
Registered: 07-2002
| | Posted on Monday, December 03, 2012 - 07:53 pm: |
|
Bob, first I welded in the keyways, then I put it in the lathe and took a light cut so everything was running true. Next step was to weld it, I did the flywheel area first, machined it true, then welded the mains and over the flywheel area. It filled in well, no voids. The keyways will have to be recut. |
johnny
Senior Member
Username: johnny
Post Number: 445
Registered: 03-2006

| | Posted on Wednesday, December 05, 2012 - 11:32 am: |
|
JB, After you welded and grind the crank how straight did your mains and con-rod journal come out? Have much trouble with the crank moving due to stress from all the welding or did you do annealing of some kind after you roughed it? |
jb_castagnos
Senior Member
Username: jb_castagnos
Post Number: 741
Registered: 07-2002
| | Posted on Wednesday, December 05, 2012 - 05:46 pm: |
|
THe cranks I've welded seem to be stable. These old shafts are fairly soft, I would compare them to cold roll. When you straighten one it doesn't take much over correction to get it right, they aren't springy. When welding I use the mig with 70,000 psi wire, I believe this is harder than the shaft but it's called mild steel. I was told it blends with the base metal and comes in somewhere between. The crank turns red while welding, I let it cool naturally, it machines well in the lathe. I've found that if you come back and touch up a spot it will cool fast and be hard, obvious when rough turning in the lathe. Some of the guys with the Dispros had cranks weklded at a crank shop, they all broke. My guess is that they used a hard material, the soft base metal flexed, the hard metal cracked and migrated on through. |
miro
Senior Member
Username: miro
Post Number: 641
Registered: 11-2001

| | Posted on Wednesday, December 05, 2012 - 09:18 pm: |
|
The copper jacket Dispro engine cranks that were built up with flame spraying all ( or all that I know of) broke with a cone shaped fracture. That was after they had been running for a while (hours)
under full load. I suspect that if they were only show engines and run with no load, they might take a while to fracture - but they would fracture eventually.
The technique now is to have them chrome plated up and then ground to finish dimension. The plating shop can do up to about 75-80 thou.
miro |
jb_castagnos
Senior Member
Username: jb_castagnos
Post Number: 743
Registered: 07-2002
| | Posted on Friday, December 07, 2012 - 08:03 pm: |
|
Finished another one. This is for a YT-1. Dick Day sent it to a local crank shop, they didn't realize it was sleeve bearings, only ground the main area, no way to slip a .010" under bearing over the standard ends. I welded it, roughed it in in the lathe and ground it standard. Looks like it should work. 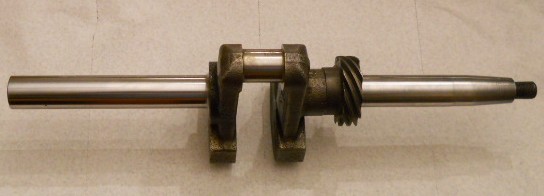 |
richardday
Senior Member
Username: richardday
Post Number: 1034
Registered: 11-2003

| | Posted on Saturday, December 08, 2012 - 01:27 pm: |
|
Beautiful job. Thank you so much Dick |