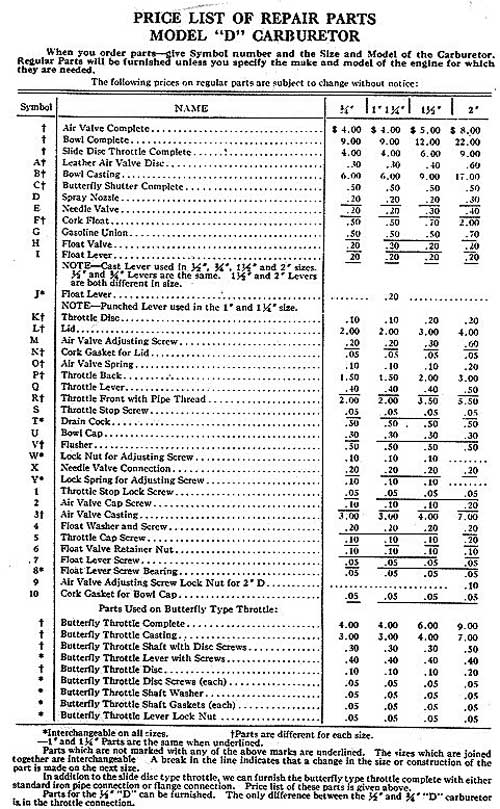
| Author |
Message |
    
Harv
| | Posted on Thursday, December 11, 2003 - 03:37 am: | 


|
Help! I have a two-lung St Lawrence serial 561 with Schebler D carb. The carb and engine body look complete, but the ignition system looks like a recent jerry-rig. It consists of two sets of automotive points, each with its own coil and condenser, and both are operated by a roughly-made cam on the shaft. I've no idea what the original ignition system should look like. Does anyone know of a site with some good photos. The engine is intended as a display for a small maritime museum, and while getting it running isn't a priority, it would be a 'nice-to-do' sometime down the road. Thanks. |
andrew
| | Posted on Thursday, December 11, 2003 - 09:34 am: |
|
Harv,
Can you post a picture of it? Most of the St Lawrence engines I have seen were timed with a lever and contact points on the crank between the flywheel and the cylinder. A picture of your engine might confirm.
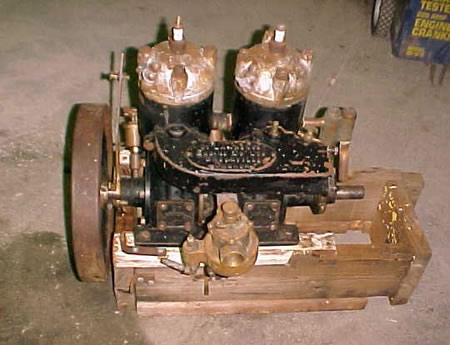
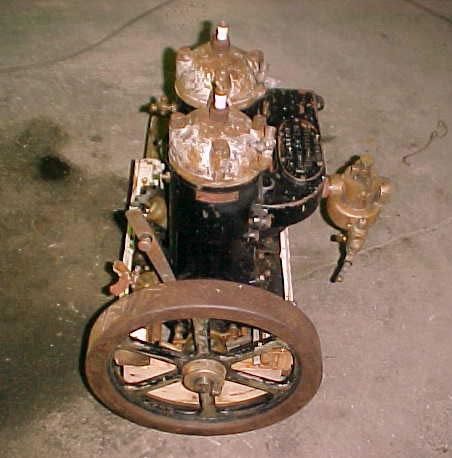
Below is a 2 cylinder model:
 |
doug11k
| | Posted on Thursday, December 11, 2003 - 09:51 am: |
|
Harv, Try this site: http://www.disappearingpropellerboat.com/specifications.html |
J.B. Castagnos
| | Posted on Thursday, December 11, 2003 - 01:32 pm: |
|
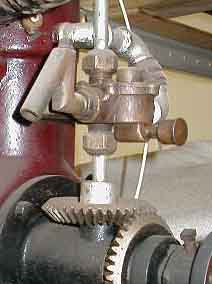
Harv, that's my 2 cylinder Andrew has pictured. I had to rebuild the timer assembly. If you look through the flywheel in the bottom picture you'll see a round bar on each side of the timer. These have a stud brazed to them and are held to the lever through insulating washers, a wire goes from these to each coil. The bar is drilled to accept a spring and brush. On the crankshaft is a comutator made of insulating material. It's held to the flywheel by two countersunk screws, one of these goes through a brass contact that's inlaid into the insulating ring. The brushes rub on the ring, when they hit the brass contact it provides a ground, allowing it to fire. These engines use a buzz coil and do not need an external condensor. If you need any more info e-mail me. |
Harv
| | Posted on Thursday, December 11, 2003 - 05:00 pm: |
|
There is nothing on the flywheel end but the flywheel. The ignition setup is a home-built affair on the end opposite the flywheel and is not stock. Apparently 20 years ago some students dug the engine out of a swamp and got it running as a class project. None of the photos I've seen yet show enough detail of the stock ignition system to give me an idea of what I should be looking for - the only thing I can see is a brass lever a foot or so long. Unfortunately attending an engine show to see the real thing is not an option. The St Lawrence spec sheet was great as an addition to the museum display, but still doesn't have enough detail of the ignition system. |
Harv
| | Posted on Thursday, December 11, 2003 - 05:02 pm: |
|
\image |
Harv
| | Posted on Thursday, December 11, 2003 - 05:06 pm: |
|
 |
Harv
| | Posted on Thursday, December 11, 2003 - 05:09 pm: |
|
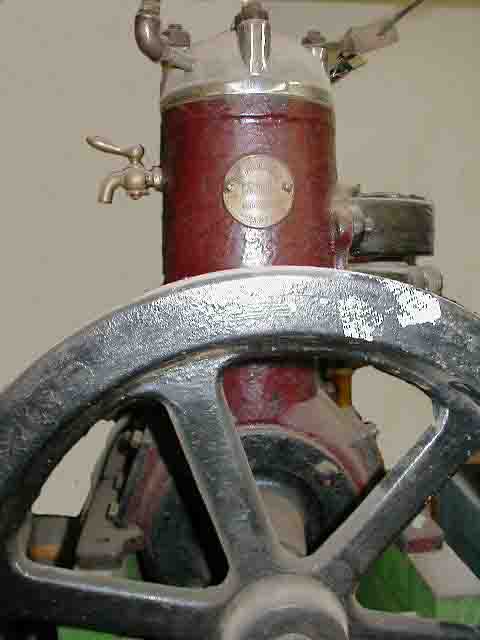
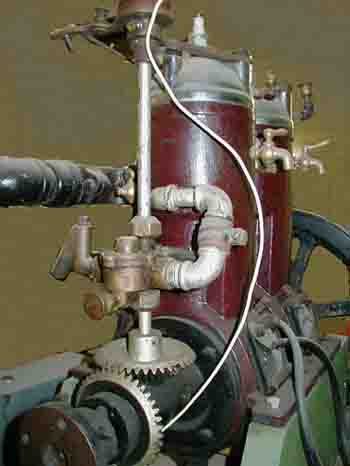
Finally figured out how to post pictures. Here is the ignition setup.
 |
Keith
| | Posted on Friday, December 12, 2003 - 11:14 am: |
|
Harv
I will add a few pictures this afternoon, of my St Lawrence with a gear driven water pump and timer mounted to the rear of the engine.
Keith |
Keith
| | Posted on Friday, December 12, 2003 - 12:54 pm: |
|
Picture1 |
keith
| | Posted on Friday, December 12, 2003 - 12:57 pm: |
|
Try Again.
 |
keith
| | Posted on Friday, December 12, 2003 - 01:01 pm: |
|
 |
Keith
| | Posted on Friday, December 12, 2003 - 01:03 pm: |
|
/image{ST2} |
Keith
| | Posted on Friday, December 12, 2003 - 01:04 pm: |
|
 |
Keith
| | Posted on Friday, December 12, 2003 - 01:08 pm: |
|
One of the things that is different about this engine, than other St Lawerence engines that I have seen, is the oval tag. Is this early or late? There is no serial no on the tag. Harv, I can email better pictures if needed.
Keith
 |
ratedpwg
Member
Username: ratedpwg
Post Number: 5
Registered: 07-2019
| | Posted on Thursday, July 25, 2019 - 02:40 am: |
|
Hello J.B. Castagnos:
I am new here and have just acquired an old st.lawrence single cylinder engine according to pictures I have seen like the earlier one in this post. I will post some pics as soon as I get them. I have no ignition except an arm behind the flywheel I assume for advance or retard in timing. I also have no carb on it. It is unfortunately missing its id tag on the cylinder but it has the tall skinny flywheel on it. I was wondering if you could tell me about how it was wired for ignition and where I might be able to acquire the missing parts for it.
Thanks in advanced,
Paul |
miro
Senior Member
Username: miro
Post Number: 1053
Registered: 11-2001

| | Posted on Friday, July 26, 2019 - 10:22 pm: |
|
Since you already have the timer lever, you are at least more than half way home.
You'll need two cartridge-like spring loaded contacts to complete the ignition. There should be mounting points on the level casting for the 'cartridges". The "cartridges" contact the ground of the engine on a fiber ring on the cranckshaft, thus completing the circuit to energize the coil.
I was able to remove the cartridges, and replace the bullets and the spring behind the bullets without taking off the flywheel.
An ignition system with 2 coils is required.
The carb is usually a Schebler D and has a throttle plate assembly to, but other carbs will work as well.
Miro |
miro
Senior Member
Username: miro
Post Number: 1054
Registered: 11-2001
| | Posted on Friday, July 26, 2019 - 10:26 pm: |
|
OOPS - I was side-tracked with the pictures of the 2 cylinder versions - .
You only have one contact and need only 1 coil.
I'll see if i can get pictures of my ignition parts - they're hidden behind the non-usual flywheel.
miro |
miro
Senior Member
Username: miro
Post Number: 1055
Registered: 11-2001
| | Posted on Friday, July 26, 2019 - 10:32 pm: |
|
You can see the engine ignition lever in this post - scroll down a bit.
http://www.oldmarineengine.com/discus/messages/4/276504.html
But there isn't the detail you need.
miro |
bcm
Senior Member
Username: bcm
Post Number: 100
Registered: 11-2009
| | Posted on Saturday, July 27, 2019 - 12:37 pm: |
|
 |
ratedpwg
Member
Username: ratedpwg
Post Number: 6
Registered: 07-2019
| | Posted on Monday, July 29, 2019 - 07:34 am: |
|
Ok those pieces in the picture above seem to be there already!=) So is there anything else I need and where do you think I could obtain a carb for one or how would I co to adapt a different carb?
Thanks again for the help,
Paul
PS Do these engines require a head gasket too? If so do you know where I can buy one?
Thanks |
ratedpwg
Member
Username: ratedpwg
Post Number: 7
Registered: 07-2019
| | Posted on Monday, July 29, 2019 - 07:40 am: |
|
One other thing I forgot,... The wire for the spark plug .... Is it special wire and where does it attach to the engine... any bit of help with this project is greatly appreciated.
Thanks alot,
Paul
PS Sorry for all the posts. |
bruce
Senior Member
Username: bruce
Post Number: 680
Registered: 07-2002
| | Posted on Monday, July 29, 2019 - 09:47 am: |
|
Schebler Carbs come up on E-bay quite often. Look for "brass carburetors" on e-bay search. Look for one with a 3/4 inch or 1 inch pipe size inlet. Spark plug wire comes from the high tension lead on the spark coil to the spark plug. Use copper core ignition wire.Click on the "technical tab" here for ignition wiring diagrams. Best technical help can be found in your area at a local /regional antique farm equipment/ engine show. Farm gas engine ignition is often similar scheme |
bcm
Senior Member
Username: bcm
Post Number: 101
Registered: 11-2009
| | Posted on Monday, July 29, 2019 - 06:12 pm: |
|
Paul,
It's difficult to help you without some images of your engine.
Here is an ignition system sketch that may help to identify some of the ignition components.
The correct carburetor is a one inch Schebler Model D.
Barry
 |
ratedpwg
Member
Username: ratedpwg
Post Number: 8
Registered: 07-2019
| | Posted on Tuesday, July 30, 2019 - 01:29 pm: |
|
Thanks Barrie,... That diagram looks exactly like the motor I have. Do you know where to locate a buzz timer for the ignition system? I am trying to locate a carburetor for it too. I am currently trying to get some photos posted. (trouble with computer) As soon as I can.
Thanks for the help,
Paul |
bruce
Senior Member
Username: bruce
Post Number: 681
Registered: 07-2002
| | Posted on Tuesday, July 30, 2019 - 03:41 pm: |
|
New model T Ignition buzz coils are available for sale on line.Or build the ignition
circut Miro and JB show here on OME. Look on E-bay under Brass Carburetors for sale or at your local antique car show flea market |
dick_briggs
Advanced Member
Username: dick_briggs
Post Number: 33
Registered: 02-2015
| | Posted on Monday, August 05, 2019 - 11:54 am: |
|
Paul, Wondering if you are still looking for a carburetor and buzz coil for your engine. I have two Scheblers available, as well as some buzz coil options. If you are interested I can send pictures and details. Dick |
ratedpwg
Member
Username: ratedpwg
Post Number: 9
Registered: 07-2019
| | Posted on Friday, August 09, 2019 - 11:52 pm: |
|
Hi,
Just another question about stuff I need for my st.lawrence single cylinder 2stroke engine... I am wondering if it comes or needs a head gasket as the engine I have came with the head not put on tight. I took the nuts off and found it doesn't have a head gasket.... does anybody know if it should have one and if so where I could get one?
Thanks
Paul |
ernie
Senior Member
Username: ernie
Post Number: 2545
Registered: 01-2002
| | Posted on Saturday, August 10, 2019 - 06:44 am: |
|
Yes it needs a head gasket.
Gaskets to go www.gasketstogo.com does a good job with custom gaskets at a reasonable price.
Hope this helps
Ernie |
bcm
Senior Member
Username: bcm
Post Number: 102
Registered: 11-2009
| | Posted on Saturday, August 10, 2019 - 05:39 pm: |
|
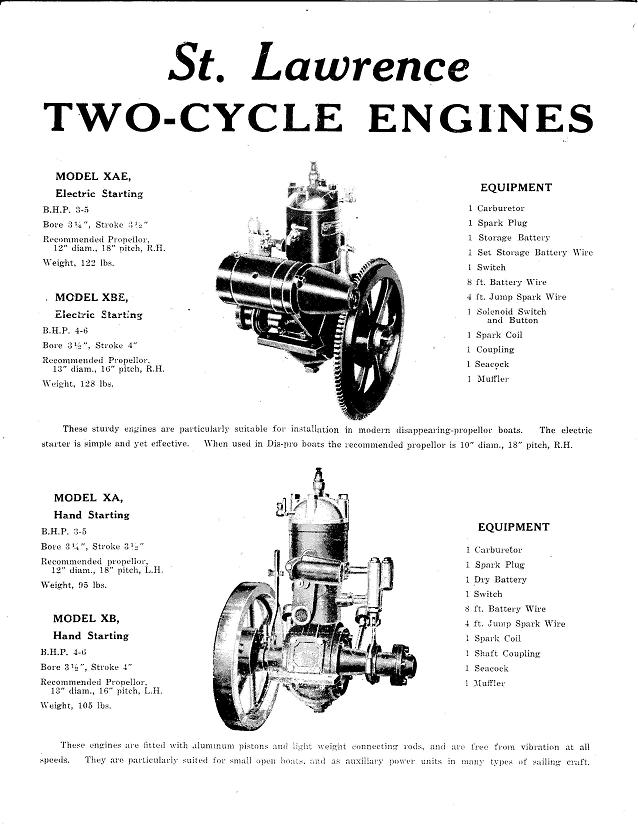
St Lawrence manufactured two single cylinder two cycle engines, 3HP and 4 HP.
Diameter of the 3HP head is 5", diameter of the 4HP head is 5 1/2".
You must first determine which engine is yours, then I can provide you with source for in stock head gaskets.
Barry |
ratedpwg
Member
Username: ratedpwg
Post Number: 10
Registered: 07-2019
| | Posted on Friday, August 16, 2019 - 08:21 am: |
|
Hi Barry,
My engine single cylinder engine. It has no ident tag on it for serial and such. I am still trying to get my photos small enough to just email right now nevermind posting. The camera I am using has a low setting which is higher then my email or this posting program allows so I have no pics of it I can share as of yet. As soon as I get some they will be here. Promise.
Thanks again for all of the help from everybody here.
Paul |
ratedpwg
Member
Username: ratedpwg
Post Number: 11
Registered: 07-2019
| | Posted on Friday, August 16, 2019 - 08:26 am: |
|
Hi again Barry,
So if I understand you correctly, all I have to do is give you the diameter of the cylinder in my engine to get a headgasket then?
I will measure it and get the measurements to you asap if the is the case.
Thank you again
Paul |
ratedpwg
Member
Username: ratedpwg
Post Number: 12
Registered: 07-2019
| | Posted on Friday, August 16, 2019 - 08:41 am: |
|
Hi Everyone,
Finally I got some pictures done of my engine. I hope this helps with identifying it.
Thanks again,
Paul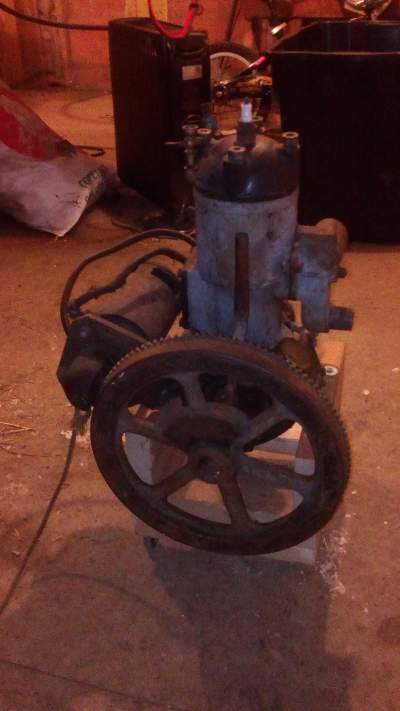 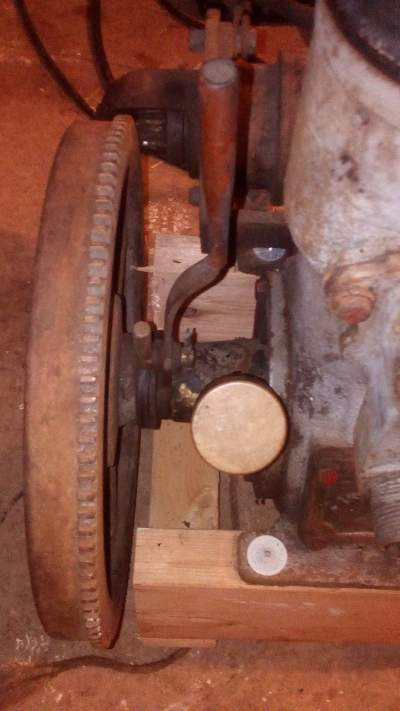 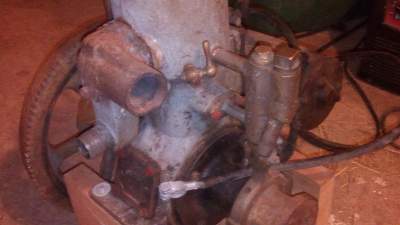 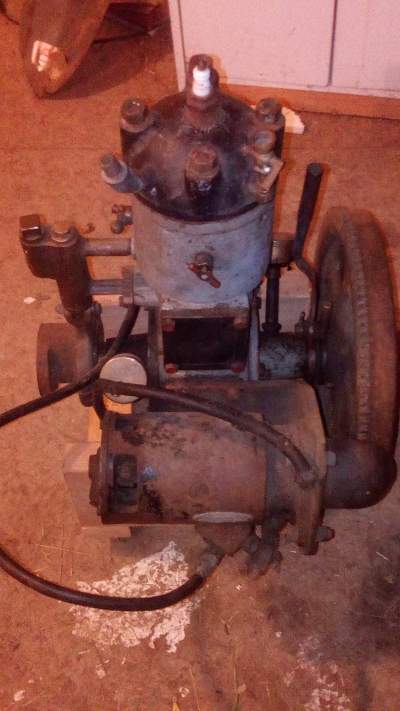 |
jb_castagnos
Senior Member
Username: jb_castagnos
Post Number: 1434
Registered: 07-2002

| | Posted on Friday, August 16, 2019 - 11:03 am: |
|
Easiest way to determine which engine is to measure the flywheel, 14" 3-4 hp, 16" 5-6 hp. |
jb_castagnos
Senior Member
Username: jb_castagnos
Post Number: 1435
Registered: 07-2002
| | Posted on Friday, August 16, 2019 - 05:44 pm: |
|
The easiest way I've found to post pictures is to take them with my phone, email them to myself in the medium size, save them to the computer. They post with no problems. |
ratedpwg
Member
Username: ratedpwg
Post Number: 13
Registered: 07-2019
| | Posted on Sunday, August 18, 2019 - 09:01 pm: |
|
Hi Barry and Jb Castagnos:
I went and measured the flywheel and the head and as it turns out I have a 4hp Engine so now I hope I can get the proper head gasket and stuff I need to repair and I can finally get it to run.... getting excited now. Oh I was also able to get from the person I picked the engine up... the carb for it too. I will get a picture of it asap to make sure it is proper and so I can get the parts for it too. It came with a cork float but it broke I guess when he put it into a box for me or when the previous owner stored it. I also need to replace and get the adjustment screw? Unstuck and replace the dried up rawhide seal that is inside the part that sucks in the air. I will take some pictures to explain.
Thanks again to everybody who has helped me in this sort of quest to get it running again.
I love this stuff.
Paul |
bcm
Senior Member
Username: bcm
Post Number: 103
Registered: 11-2009
| | Posted on Monday, August 19, 2019 - 12:00 pm: |
|
Paul,
I have a suitable gasket for 5 1/2" head, also other parts that you may require including a float. Make a list so can check what I have available.
Barry
 |
jb_castagnos
Senior Member
Username: jb_castagnos
Post Number: 1439
Registered: 07-2002
| | Posted on Monday, August 19, 2019 - 07:28 pm: |
|
Barry, the spec sheets I've seen for St. Lawrence always give a double HP rating, depending on RPM. Paul didn't give his flywheel measurement but I think he may have the smaller engine.
 |
bcm
Senior Member
Username: bcm
Post Number: 104
Registered: 11-2009
| | Posted on Tuesday, August 20, 2019 - 09:17 am: |
|
jb,
I'm also uncertain. Paul please post both flywheel actual dimension and head actual diameter.
Paul,
Before beginning your restoration suggest, as head is already loose, you exam condition of cylinder bore.
Also determine if starter motor works. If it does not then this is first isssue. Or you could remove the starter motor and flywheel then machine the flywheel to remove the ring gear teeth to restore the engine to hand start version. Refer to attachment in jb's post.
The starter motor mounting bracket is not original.
Barry
 |
ratedpwg
Member
Username: ratedpwg
Post Number: 14
Registered: 07-2019
| | Posted on Tuesday, August 20, 2019 - 10:54 am: |
|
Hi Barry and Jb:
Thank you for the continuing help I am receiving in regards to my restoration of my st.lawrence engine.
I did measure both the head and flywheel as both of you have suggested and the measurements are as follows:
Head is 5 1/2"
Flywheel is 14"
Oh and the starter does work. The inside bore is clean with what looks like crosshatching in it....I will examine it more closely in better light and hopefully I can get more pictures as I progress.
Thank you fine gentlemen in helping me with this endeavor,
Paul |
bcm
Senior Member
Username: bcm
Post Number: 105
Registered: 11-2009
| | Posted on Tuesday, August 20, 2019 - 01:10 pm: |
|
Paul,
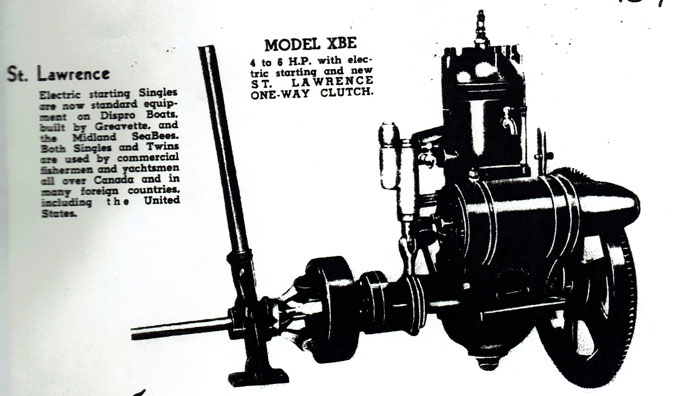
Ok, that confirms engine is XBE - 3 1/2" B x 4"S built about 1948.
Refer to catalogue page in JB's post.
Many more XAE were built as these were used for powering Dispros during 1940s. Not many XBE were built.
check www.disproboats.ca
Barry |
ratedpwg
Member
Username: ratedpwg
Post Number: 15
Registered: 07-2019
| | Posted on Tuesday, August 20, 2019 - 11:13 pm: |
|
Barry:
Thank you very much for the info on the engine.
I am now interested in getting the parts that I need for the engine.
I got a d schebler (sp?) carb for it from the previous owner. I just need to get some other parts now.
I need as far as I know right now:
gaskets
carb rebuild kit
buzz coil
not sure about the spark plug
waterpump rebuild (kit)?
Not sure what else I am missing or need right this second. Maybe a proper bracket for the starter.
Anything you can think of that would help, would be great.
Thanks
Paul |
bcm
Senior Member
Username: bcm
Post Number: 106
Registered: 11-2009
| | Posted on Wednesday, August 21, 2019 - 05:10 pm: |
|
Paul
I'll add a few small items to your list in due course. The prime concerns are the condition of the carburetor and water pump. Rebuild kits are not available. If parts are required to repair these then you must first identify each individual part, then try to locate on ome.com, or make them.
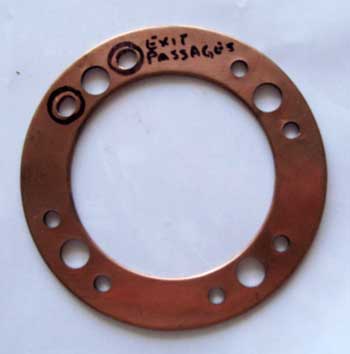
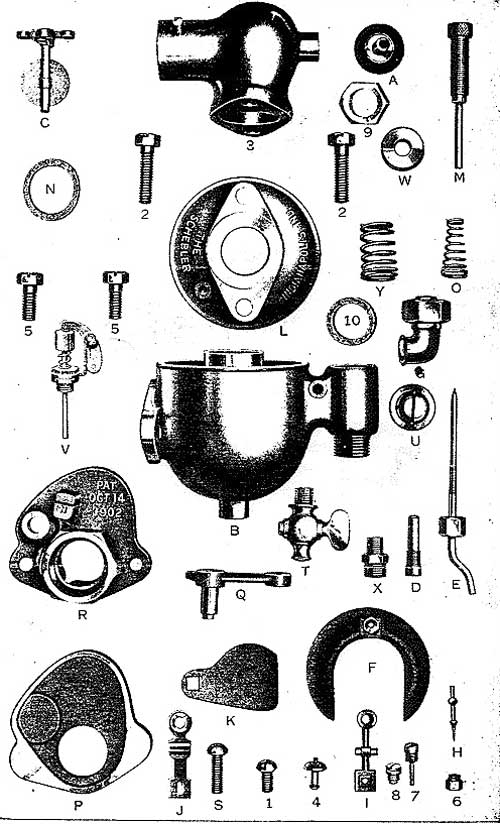
Inspect the carb to determine the parts that require repair or replacement. I've attached 3 images to assist.
I'm assuming it's a Schebler model D. Please post an image.
Take the pump apart and inspect the parts. This can be done without removing the pump from the engine. I've attached an image to assist.
Barry

 |
ratedpwg
Member
Username: ratedpwg
Post Number: 16
Registered: 07-2019
| | Posted on Wednesday, August 21, 2019 - 11:52 pm: |
|
Barry:
Thank you very much for the info. I will get a pick of the carb and yes a schebler d carb,... I need a float that is for sure and the carb and parts a w m in the diagram as this is seized and won't come out. am going to go threw everything I do need a headgasket too. I will check the water pump out and post pics as well.
Thank you for your help,
Pau |
bcm
Senior Member
Username: bcm
Post Number: 107
Registered: 11-2009
| | Posted on Thursday, August 22, 2019 - 10:23 am: |
|
Paul,
I can put together an air valve assembly that will include a,w&m also items O & W & 3 if you require these. Also I can supply a float, head gasket, buzz coil, very important gasket item N, plus other minor items.
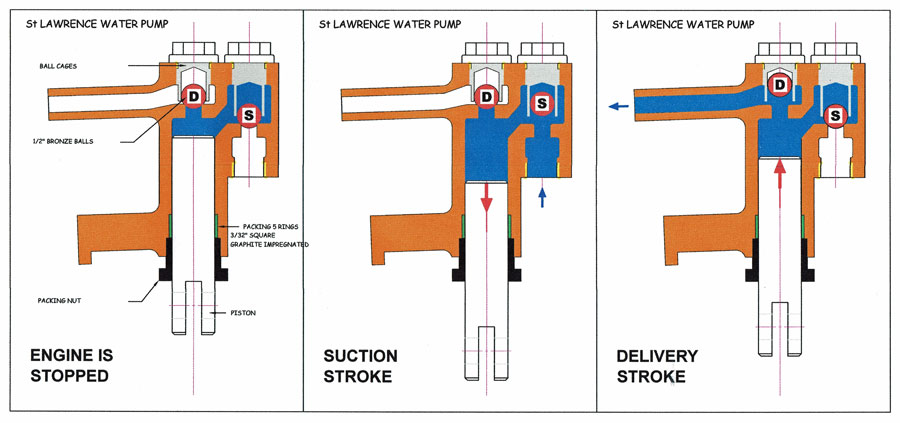
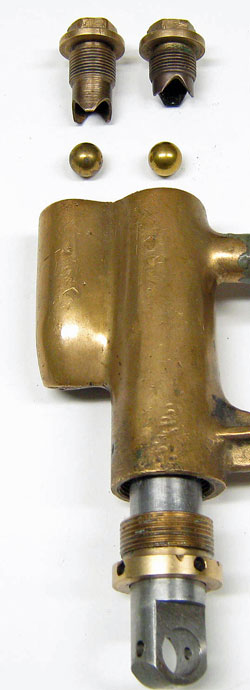
Before I send you a quote please check the water pump ball cages to ensure all three lobes are intact. Refer to the image attached to this post.
If the pump requires new packing, this can be done after you have the engine operating as it will then be obvious whether or not new packing is needed. I have the correct packing.
Barry
 |
ratedpwg
Member
Username: ratedpwg
Post Number: 17
Registered: 07-2019
| | Posted on Thursday, August 22, 2019 - 11:38 pm: |
|
Barry:
Thank you very much for the info. I will be trying to get at the engine tonight or tomorrow. I will post pics of everything.... carb and water pump.
Thanks again for the help,
Paul |
bcm
Senior Member
Username: bcm
Post Number: 108
Registered: 11-2009
| | Posted on Friday, August 23, 2019 - 08:33 am: |
|
Paul,
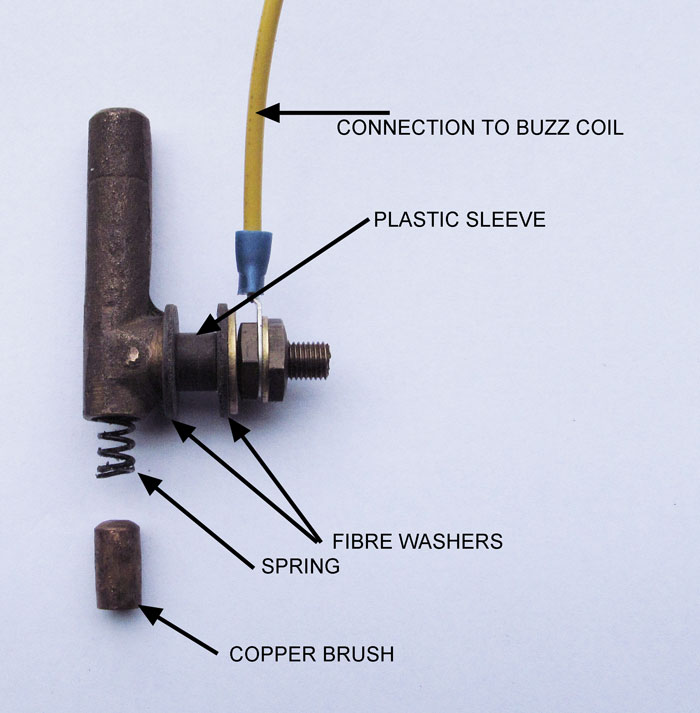
I suggest you inspect the timer brush assembly. I've attached an image to assist.
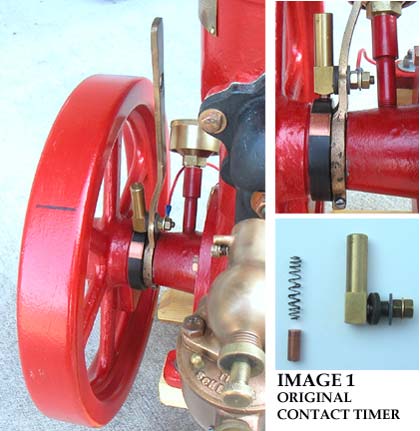
The fibre ring located behind the flywheel includes a copper slug that is positioned vertically up when piston is at TDC. The copper slug is connected to the engine frame thus is at ground potential. The brush assembly uses a spring loaded copper brush that rides on the fibre ring. Notice the two fibre washers and plastic sleeve that electrically insulates timer assembly. When engine is operating and copper slug contacts copper brush the buzz coil turns on and causes sparks to occur at spark plug. Timer lever can be positioned so that sparks occur at or after piston reaches TDC, ignition is thus advanced or retarded.
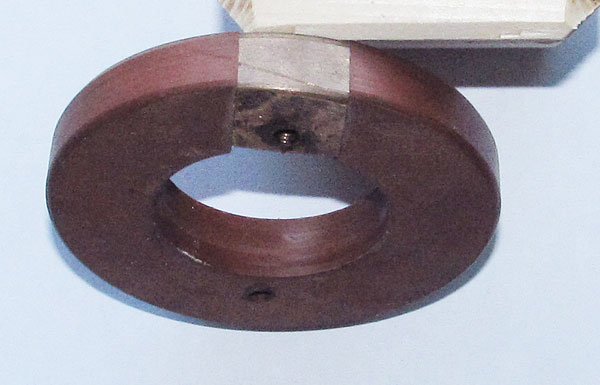
Remove the brush assembly, clean it, be sure fibre washers and plastic sleeve are in good condition and copper brush moves without binding. Also be sure fibre ring is reasonably smooth. I've attached an image of a new fibre ring for reference.
Here is a link to an ome post that provides additional information. I suggest you study this information.
http://www.oldmarineengine.com/discus/messages/3457/96400.html
Barry
 |
ratedpwg
Member
Username: ratedpwg
Post Number: 18
Registered: 07-2019
| | Posted on Friday, August 23, 2019 - 11:43 pm: |
|
Thank you Barry for some very valued info. Your technical expertise in the field of these engines is absolutely amazing and I appreciate every little bit of it.
Thank you very much.
Paul |
ratedpwg
Member
Username: ratedpwg
Post Number: 19
Registered: 07-2019
| | Posted on Saturday, August 24, 2019 - 05:17 am: |
|
Hi Barry,
Well after some work on the engine I have found some things that you may have mentioned that need to be addressed.
First the water pump. I tried to remove the top two (screws?) to access the inside like you mentioned in another post and one came out with no problem, the other has been mangled by someone... and it won't budge. Not sure how to get it out without messing the pump itself up. Plus the bottom bushings and such you mentioned are worn. So I do need to replace them or the pump itself. What would you recommend?
Second, I had the starter to turn over previously but now it won't go. I am thinking about getting a rebuilt one or having this one redone.
Third, I inspected the timer. I has little wear but it is also chewed up so I would like to inquire about the electronic conversion you mentioned me to look at. I think this would be the easiest way to solve that problem all together.
As you mentioned earlier, my list is a bit larger now.
I also would like to say that the part in the carb that I said I needed. The long adjuster in were the air comes in, It is seized and I am trying to soak it to get it out. I also have the main needle in the bottom of the carb,... the shaft part is also seized in. I am soaking the whole thing as we speak to get it out.
Other then a head gasket, I think I am on the road to make it run.
One other thing though,... how tight should the shaft from the crank to the water pump be tightened too... I found the bolt that connects the pump to the crank loose. Also how does this part get lubed? Not sure if there is suppose to be a grease nipple or something that might be missing.
Sorry for the long post but I have been doing the things you asked. I have forgotten to take some pics but I am going to when there is some light out. Early in the morning now.
Thanks
Paul |
bcm
Senior Member
Username: bcm
Post Number: 109
Registered: 11-2009
| | Posted on Saturday, August 24, 2019 - 11:38 am: |
|
Paul,
You now need to list all the items that require repair or replacement then decide if it is reasonable to spend the money and time.
In my opinion this depends on whether you have the machine tools and skill set to make and fit replacement parts. If not and you need to pay someone then in my opinion it's not worth the cost.
If there is any possibility that this is a salt water engine , then it's probably scrap.
Barry |
ratedpwg
Member
Username: ratedpwg
Post Number: 20
Registered: 07-2019
| | Posted on Sunday, August 25, 2019 - 07:55 am: |
|
Hi Barry:
I appreciate the input. I would like to see what the cost is to replace the stuff on the engine to get it running. So far I feel that the work is not out of my league so I think I will give it a try. I know someone whom can machine stuff for me so I am not worried about that.
I will get a list together and with your and his help can help me with the engine. |
ratedpwg
Member
Username: ratedpwg
Post Number: 21
Registered: 07-2019
| | Posted on Sunday, August 25, 2019 - 07:56 am: |
|
Thanks Barry |
ratedpwg
Member
Username: ratedpwg
Post Number: 22
Registered: 07-2019
| | Posted on Sunday, August 25, 2019 - 09:59 am: |
|
Hi Barry:
I have been in contact with a starter rebuild place that is going to rebuild it for me. He said it shouldn't even cost 100 dollars canadian. So I am taking care of that hopefully this coming week. I will try to get my list done today or tomorrow and I will post it for you.
Thanks again for your help.
Paul
PS Did these motors exhaust just come out like a car or was it expelled into the water like boats today? |
bcm
Senior Member
Username: bcm
Post Number: 110
Registered: 11-2009
| | Posted on Sunday, August 25, 2019 - 12:03 pm: |
|
Paul,
Re your question about cooling water and exhaust.
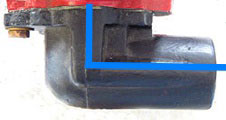
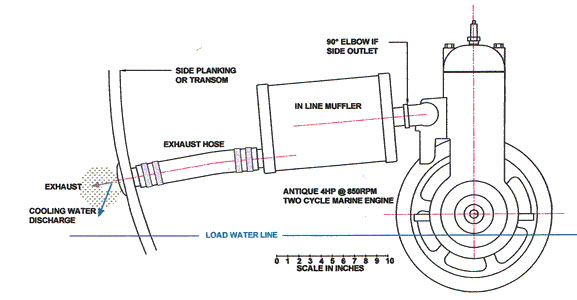
Please refer to the attached image. The blue line defines the cooling water path exiting the engine and into exhaust pipe. This cools exhaust gases thus muffling exhaust noise.
Even so a muffler is installed in the exhaust pipe before exhaust gas and water is exited into atmosphere. I've attached sketch illustrating this arrangement.
Your engine appears to have a 45 degree elbow in the head to exit cooling water. This is not factory installation and may have been used if the engine was installed below boat water line as would be the case for a sail boat auxiliary engine.
You need to examine the exhaust elbow to determine if the cooling water exit is blocked so as to cause cooling water to exit via the elbow.
Barry
 |
ratedpwg
Member
Username: ratedpwg
Post Number: 23
Registered: 07-2019
| | Posted on Monday, August 26, 2019 - 06:49 am: |
|
Barry:
Thanks again, I will check this. If I understand you correctly... The exhaust may or may not have water come out of it? I am also wondering with the water in the engine.... does the engine have a bleed screw in it to remove air from the water passage while it runs or is the cooling a closed system?...I know about the cup to prime it, the entrance via the water pump,the valve to open while the engine starts which decreases compression but not the elbow on the engines' head.
Thanks
Paul |
ratedpwg
Member
Username: ratedpwg
Post Number: 24
Registered: 07-2019
| | Posted on Monday, August 26, 2019 - 06:51 am: |
|
Barry:
Sorry, I just re-read your post and now understand about the exhaust. Sorry for re-asking the question.
Paul |
bcm
Senior Member
Username: bcm
Post Number: 111
Registered: 11-2009
| | Posted on Tuesday, August 27, 2019 - 01:50 pm: |
|
Paul,
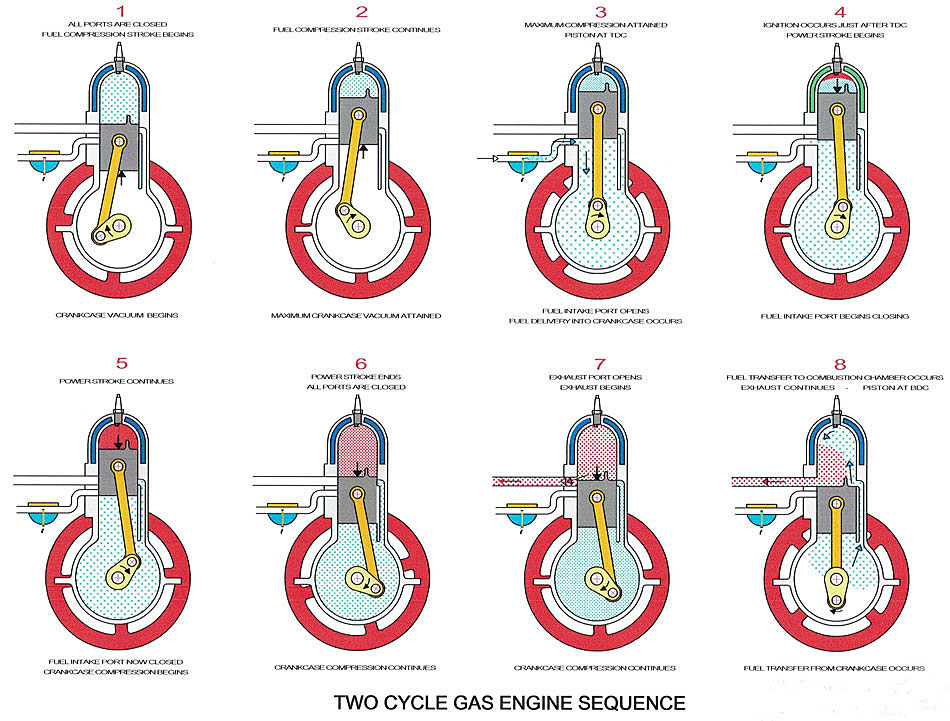
Here is an image that explains the sequence during one revolution of your engine. I recommend you study this so you understand how your engine works. This knowledge will be invaluable when you learn to start and operate your St Lawrence.
Understanding the role of the crankcase will explain the purpose of the grease cups. I look forward to hearing from you regarding this important component.
Barry
 |
ratedpwg
Member
Username: ratedpwg
Post Number: 25
Registered: 07-2019
| | Posted on Thursday, August 29, 2019 - 12:33 am: |
|
Hi Barry:
Well from what I can understand so far about the crankcase and the grease cups. I know that the crankcase fills up with the 2 stroke mix and the oil gets deposited onto the components of the engine so that it helps lube the components and the grease cups provide grease for the bearings. I believe that the grease may get sucked into the bearings when the mix comes from the crankcase and goes into the head to be burned.
I think I am on the right track in regards the purpose of these components and how they work.
If I am wrong I apologize and I look forward to learning about how these engines work properly.
Thanks again Barry. You seem to be the ultimate guru when it comes to these engines and I really appreciate the time and effort you have put towards helping me with the engine that I have. I really want to do this and the money aspect of things doesn't bother me.
This is something that I have always wanted to do even if it turns out to be the only one I do.
Thanks
Paul
PS Can you put together a list and prices based on what we have discussed so far. I don't want to get the names of the parts wrong and get them from you when I don't really need them. |
bcm
Senior Member
Username: bcm
Post Number: 112
Registered: 11-2009
| | Posted on Thursday, August 29, 2019 - 02:35 pm: |
|
Paul,
When you study the sequence diagram, be aware that the text at top describes events occurring above the piston whereas the text at bottom describes events that are occurring in crank case.
When piston descends (starting at sequence 5) the volume of gases in crankcase reduces thus pressure increases. When piston approaches BDC (sequence 8), transfer port is uncovered by top of piston so air /gas mixture in crankcase rushes into combustion chamber because of crankcase pressure.
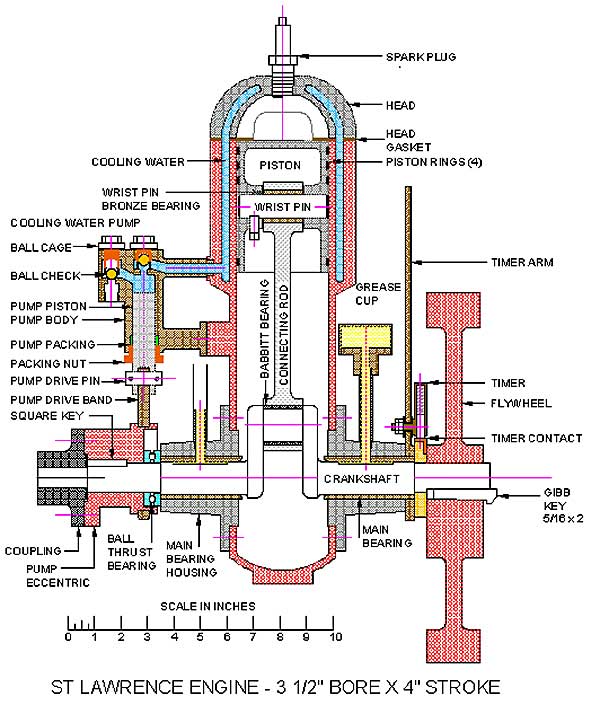
Now take a look at the picture attached to this post. Note the long bearings supporting crankshaft . These are supplied with grease from grease cups. Although the grease obviously provides lubrication, the grease s acts as a seal that prevents crankcase leakage. Otherwise the air fuel mixture would leak through the bearings; consequently the combustible mixture would not transfer to combustion chamber. Engine would not run.
I suggest you remove grease cups and pipe nipples and thoroughly clean out all old grease and replace with fresh grease. NLGI grade 3 is preferred, NLGI grade 2 will work.
Barry
 |
bcm
Senior Member
Username: bcm
Post Number: 113
Registered: 11-2009
| | Posted on Friday, August 30, 2019 - 02:22 pm: |
|
Paul,
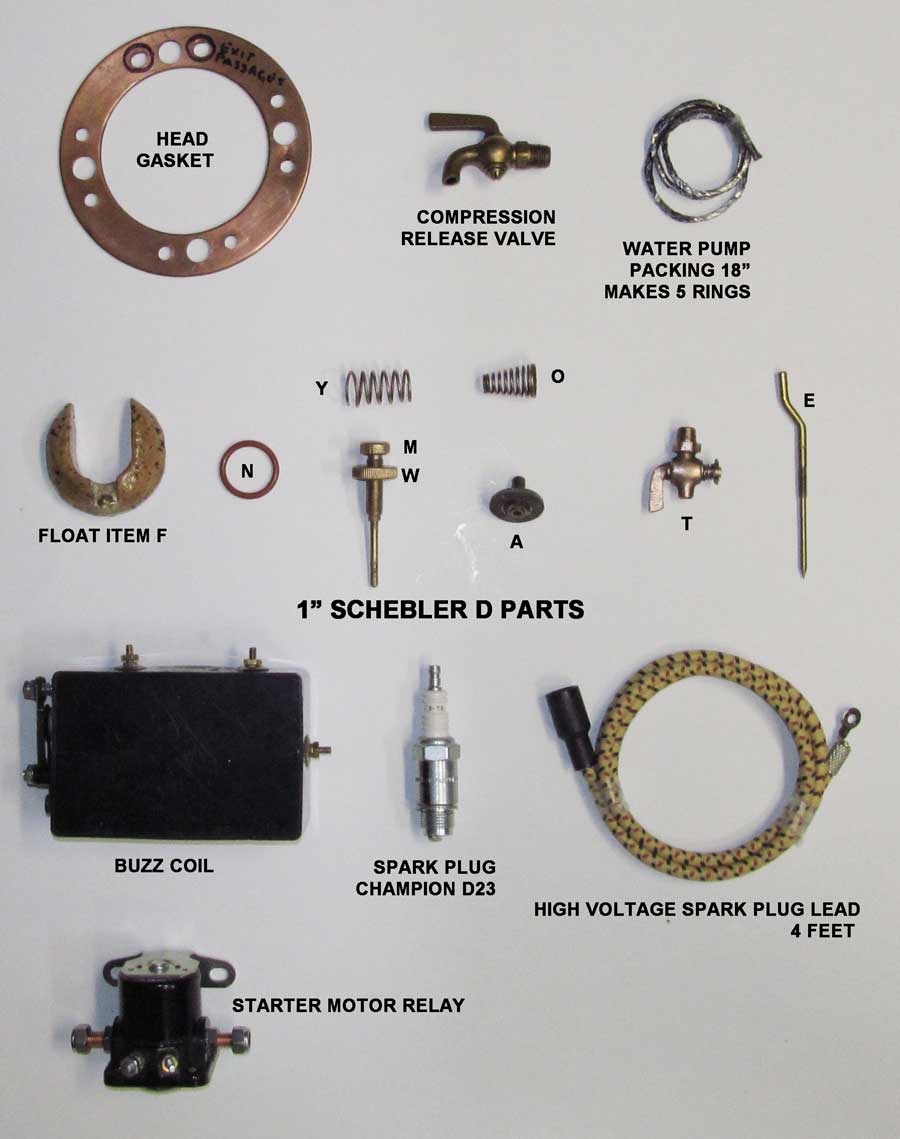
Refer to the image that shows the parts that I have on hand.
Select those that you require then I can work out a price.
Barry
 |
ratedpwg
Member
Username: ratedpwg
Post Number: 26
Registered: 07-2019
| | Posted on Sunday, September 01, 2019 - 02:03 am: |
|
Hi Barry:
What would you say price wise if I was to ask you for one of each in you list?
Thanks Paul |
bcm
Senior Member
Username: bcm
Post Number: 114
Registered: 11-2009
| | Posted on Monday, September 02, 2019 - 09:57 am: |
|
Paul,
Before providing a price, please let me know the numbers/letters on the spark plug so I can verify what it is.
Barry |
bcm
Senior Member
Username: bcm
Post Number: 115
Registered: 11-2009
| | Posted on Monday, September 02, 2019 - 10:13 am: |
|
Paul,
1 - Please post images of your carburetor.
2 - Did you check condition of the timer brush assembly reference my Aug 23 post?
Barry |
ernie
Senior Member
Username: ernie
Post Number: 2547
Registered: 01-2002
| | Posted on Monday, September 02, 2019 - 12:01 pm: |
|
Suggest individual sales agreements/arrangements be done via e-mail and not the public board.
Thanks |
bcm
Senior Member
Username: bcm
Post Number: 116
Registered: 11-2009
| | Posted on Monday, September 02, 2019 - 02:59 pm: |
|
Ernie,
Thanks for the tip.
Paul, please check your email. I'll send you a email so we can set up an email thread.
Barry |
ernie
Senior Member
Username: ernie
Post Number: 2549
Registered: 01-2002
| | Posted on Monday, September 02, 2019 - 03:27 pm: |
|
Yup it just keeps the board cleaner
Thanks |
ratedpwg
Member
Username: ratedpwg
Post Number: 27
Registered: 07-2019
| | Posted on Tuesday, September 03, 2019 - 12:16 am: |
|
Ok will do.
Paul |
ratedpwg
Member
Username: ratedpwg
Post Number: 28
Registered: 07-2019
| | Posted on Tuesday, November 19, 2019 - 07:55 pm: |
|
Hi Barry:
Thank you for the parts box to help me get my engine going. I have had some time away as I was very ill. I am now getting somewhat back to normal. So I would like to enlist your assistance with my engine again if you don't mind. I tore into the carb and put the pieces in that you had in the kit but when I installed the o ring.... it made the top of the carb not seal and it sort of looked like it was bending when I went to do the two bolts up. So I was thinking, do I sand the o ring thinner or ? I am not sure what to do about it.
Any help with this would be great. Again Thank you for all you have helped me with so far.
Paul |
chris_spring
Advanced Member
Username: chris_spring
Post Number: 34
Registered: 02-2019
| | Posted on Wednesday, November 20, 2019 - 06:21 am: |
|
I had the same issue with my Monarch carb. The Monarch appears to be a Schebler Model D look alike. There are only subtle differences. I made a cardboard gasket. I think the cardboard came from a cereal box or something like that. It fits and seems to work fine.
Cheers! |
ernie
Senior Member
Username: ernie
Post Number: 2557
Registered: 01-2002
| | Posted on Wednesday, November 20, 2019 - 08:27 am: |
|
Schebler/Monarch carb O rings
As mentioned above about carb O rings/gaskets.
Someone please correct me if I am wrong. Oh and provide the O ring size and source if you know one that fits good with out the concerns mentioned above and below.
From what I have seen there is no easily commercially available O ring to fit 1 inch carbs. 3/4 and 1 1/4 are easy. Just pick the O ring out of my Harbor Freight assortment.
On the 1 inch ones you do need to be careful as the O ring that looks closest is really too fat. When you tighten the carb top down it may pop out into the main air passage, or distort the carb top.
The best alternative that I have found is to make a gasket/s from CORPRENE GASKET MATERIAL available from Lee W Pederson. Just google his name.
Note you might need to make 2 gaskets to get the correct thickness.
To check if what you are using is correct put the carb top on without the air horn using short 5/16 bolts so you can make sure the O ring or gasket/s you used are going to work and that you haven't distorted the carb top.
Plain cork and other materials don't seem to last all that well. I like carb repairs to be as permenant as possible so I try to stay away from organic materials.
Hope this helps
Ernie |
bcm
Senior Member
Username: bcm
Post Number: 120
Registered: 11-2009
| | Posted on Wednesday, November 20, 2019 - 12:25 pm: |
|
Paul
I've used O ring #214 for many 1" carbs without
problem. O ring dimensions are 1"ID X 1 1/4" OD.
Paul, that is the size included in your kit. If it doesn't seal your carb then put a gasket under the ring until it does.
Barry |
ernie
Senior Member
Username: ernie
Post Number: 2558
Registered: 01-2002
| | Posted on Wednesday, November 20, 2019 - 05:31 pm: |
|
BCM that is the size that will bulge out on the inside. If it is 1 inch ID and 1 1/4 OD it is 1/8 in dia. That is too big. Most carbs have less than 1/8 inch clearance in the center for the gasket. I just checked my assortment and #214 is the one that doesn't work in most 1 inch carbs.
Check one of your carbs as I describe above and see what you end up with.
Ernie |
bcm
Senior Member
Username: bcm
Post Number: 121
Registered: 11-2009
| | Posted on Thursday, November 21, 2019 - 09:18 am: |
|
Try O ring #121, it is 3/32 diam and 1 1/4" OD.
Also try O ring #024, it is 1/16" diam and 1 1/4" OD.
Check as Erie suggests with air horn off so you can determine which one provides a good seal.
Or make gaskets as Ernie suggests. I can mail you gasket material, let me know
Barry |
ernie
Senior Member
Username: ernie
Post Number: 2559
Registered: 01-2002
| | Posted on Friday, November 22, 2019 - 05:52 pm: |
|
BCM,
Thanks for the other size suggestions. They aren't in my assortment, nor at the local hardware store which I thought had a real good assortment.
Ernie |
bcm
Senior Member
Username: bcm
Post Number: 122
Registered: 11-2009
| | Posted on Saturday, November 23, 2019 - 01:02 pm: |
|
Paul & Ernie,
I'll pick up some #121 viton O rings and mail some to Paul. Ernie I will also mail you some if you email me your address.
These are 1 1/16 ID so squeeze out should be no issue.
Barry |
ernie
Senior Member
Username: ernie
Post Number: 2560
Registered: 01-2002
| | Posted on Monday, November 25, 2019 - 10:37 am: |
|
Barry,
Thanks for the kind offer.
Once I had the number I found them at Lowes and Home Depot.
Have a good holiday
Ernie |