| Author |
Message |
    
warrene77
Member
Username: warrene77
Post Number: 8
Registered: 04-2013
| | Posted on Wednesday, September 09, 2015 - 08:34 pm: | 


|
Hello all,
I'd like to restore my Gray twin engine and get it running.
There is no tag on the engine but I hope someone will be able to identify it by Model No.
I would like to get an instruction manual for the engine and an instruction manual for the Krice carburetor.
All help sincerely appreciated!
Warren |
richarddurgee
Senior Member
Username: richarddurgee
Post Number: 3664
Registered: 11-2001
| | Posted on Thursday, September 10, 2015 - 09:57 am: |
|
*
Look very closely at the front outer rim of the flywheel for stamped numbers, they can be very faint a coat of paint can hide them ?
Probably 1916 to early 1920's
* |
warrene77
Member
Username: warrene77
Post Number: 9
Registered: 04-2013
| | Posted on Sunday, September 13, 2015 - 10:00 pm: |
|
Thank you Richard. I've looked closely with several different light angles and can't see any numbers. I'll remove paint and see what's there at some point.
I'd like to get this engine running well before cosmetic restoration.
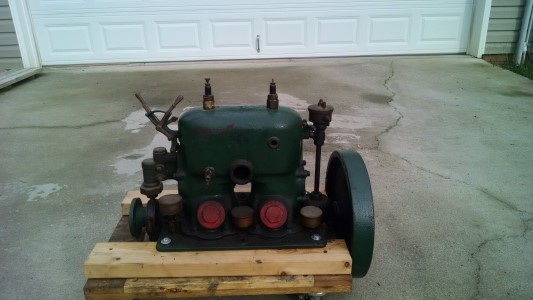
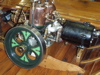
From research, I believe this is a Gray Model "U" double cylinder "Gray Flyer".
I removed the inspection plugs and it looks good inside. The engine is good and free with compression released and has very good compression when closed up. I'll make a sturdy mounting cradle and then I'll clean up the timer and put a known good Schebler carburetor on and see what happens!? |
billschaller
Senior Member
Username: billschaller
Post Number: 636
Registered: 12-2003

| | Posted on Monday, September 14, 2015 - 01:38 am: |
|
mine has a better scar.
 |
warrene77
Member
Username: warrene77
Post Number: 10
Registered: 04-2013
| | Posted on Monday, September 14, 2015 - 08:43 am: |
|
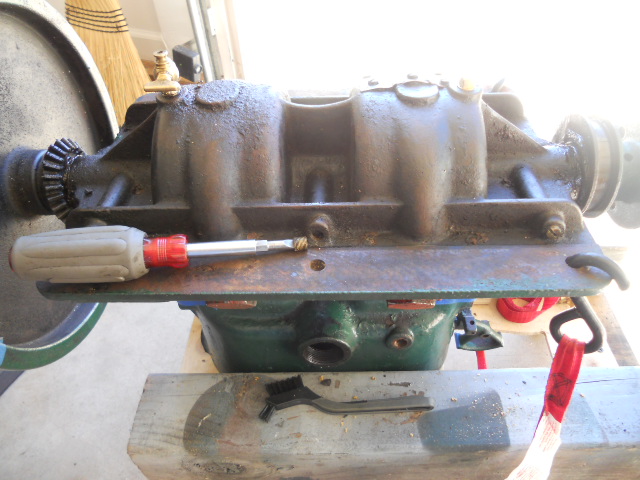
Bill, mine has a patch on the bottom of the crankcase! If I can turn it over I'll post a picture.  |
warrene77
Member
Username: warrene77
Post Number: 11
Registered: 04-2013
| | Posted on Monday, October 12, 2015 - 07:50 pm: |
|
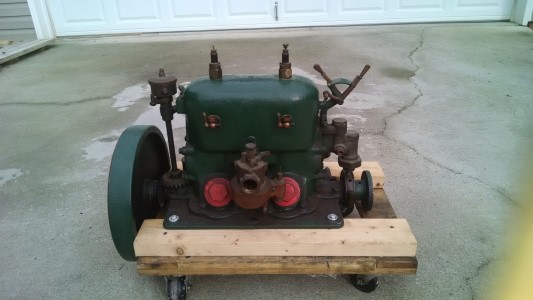
Gray Model U with two cylinders.
I was un-able to post the picture of the patch on the bottom.
I have gotten this one ready to run....but:
It will fire from priming only.
Using known good buzz coils.
Using known good Schebler Model D carb.
Trying to "Bump" the engine clockwise for counterclockwise running.
Timing retarded.
No check valve. Engine had a Krice carb. when I got it and there was no check valve.
I removed the carb. and put masking tape over the carb. inlet and could see the tape bulge outward and inward when turning the engine over.
Does this mean I need a check valve?
If so, does anyone have any ideas about where to get an appropriate check valve. The carb. inlet is 1" NPT.
Also, would adding a muffler for back pressure be of any help?
All ears and appreciative of any help!
Thanks,
Warren |
jb_castagnos
Senior Member
Username: jb_castagnos
Post Number: 1108
Registered: 07-2002

| | Posted on Monday, October 12, 2015 - 09:35 pm: |
|
If the engine is in good shape it should go. A check valve won't help a twin with one carb. The pistons are moving 180 apart and the check would never get back pressure. Be sure the pistons are in correctly, the baffle should be away from the exhaust. remove the plugs and crank the engine, you should hear a pop and feel a puff of air as the crankcase charge enters the cylinder. Be sure no plugs or screws are missing from the crankcase. Are the mains in good shape, greased?
The center bearing is just as important as the outers to keep compression in. |
jb_castagnos
Senior Member
Username: jb_castagnos
Post Number: 1109
Registered: 07-2002
| | Posted on Monday, October 12, 2015 - 10:09 pm: |
|
Just a note, I believe the exhaust is in the center of the engine, transfer ports are on the outside under those caps. This means the deflectors should be one forward and one aft as below.
( ) |
warrene77
Member
Username: warrene77
Post Number: 12
Registered: 04-2013
| | Posted on Monday, October 12, 2015 - 10:51 pm: |
|
Thank you JB.
Tomorrow I will remove the plugs, crank and listen/feel for the pop and puff of air. The engine has very good compression. There are no screws or plugs missing. I tried to clean the grease passages using heat and a piece of wire and put grease fittings in place of grease cups but am un-able to get new grease into the main bearings (literature I've read recommends not "splitting" the crankcase because of difficulty sealing with new gaskets). The explosions I get from priming are very strong so now that I know a check valve is not necessary, I'll try a little more at getting fuel from the carb. into the engine - perhaps using the "tickler" and/or opening the needle more than 1/2 turn. (I have the throttle at about 20% and the needle 1/2 turn CCW).
Do you have any thoughts about exhaust back pressure? Should I check the screens in the transfer ports?
I assume the pistons are in place properly.
Thanks again,
Warren |
jb_castagnos
Senior Member
Username: jb_castagnos
Post Number: 1110
Registered: 07-2002
| | Posted on Tuesday, October 13, 2015 - 08:07 pm: |
|
I've never had to work on an engine with the transfer port screens but I imagine they could get clogged. The common procedure for starting is to choke the carb, pull the engine over several times until you see gas dripping from the throttle plate one the Schebler, crank until it starts. The Schebler has a milled slot on the throttle body to carb face, this is to allow excess gas to drip, don't use a gasket here. |
warrene77
Member
Username: warrene77
Post Number: 13
Registered: 04-2013
| | Posted on Tuesday, October 13, 2015 - 09:04 pm: |
|
More thanks!
I checked the piston baffles with a flashlight through spark plug holes, OK, ( ).
Checked for the pop and then puff of air while turning the engine over. The pop was faint but I believe it was there and the puff of air was distinct.
Tomorrow I'll try to choke the carb. and pull the engine over until the gas drips from the throttle plate, turn the ignition on and then crank it. High Hopes here!
Thanks again JB |
warrene77
Member
Username: warrene77
Post Number: 14
Registered: 04-2013
| | Posted on Wednesday, October 14, 2015 - 08:54 pm: |
|
Happy Boy! I was finally able to get this beauty running for about 20 - 25 revolutions. I thought she was good to go but she stopped and stayed stopped, as did I. Also, was able to get grease into the rear main and the grease that was forced out felt OK so I will hope the middle and forword bearings will be OK for the time being. I finished up the day with a thorough re-check of the timer.... I may not be able to get back to this engine tomorrow but will try again ASAP.
All help and suggestions very much appreciated. |
warrene77
Member
Username: warrene77
Post Number: 15
Registered: 04-2013
| | Posted on Friday, October 16, 2015 - 08:27 pm: |
|
No improvement yet.
The situation is:
Initial start up I choke carb and turn engine over until a little gas drips from throttle plate.
Won't start. Prime, and it will fire a time or two. After several repetitions of that it settles down to the following:
I open priming cups and turn engine over 3 - 4 revolutions. Close the cups (add no fuel) and "bump". Engine starts easily and runs strong but only runs for a few seconds (say 10 revolutions). It will do this many times.
I've done a lot of reading in the last few days and instead of reporting success I'm still looking for the answer.
All help and suggestions very much appreciated. |
jb_castagnos
Senior Member
Username: jb_castagnos
Post Number: 1111
Registered: 07-2002
| | Posted on Friday, October 16, 2015 - 08:46 pm: |
|
Sounds like your not getting enough fuel through the carb, how far open is the needle, is the fuel level close to coming out of the venturi jet? Two cycles have to wet the crankcase before they will take off on their own. The engine is running on vapor, if the case is dry it won't reach the cylinder. Richen it, choke while it's running if necessary, it should settle in and keep going. |
solarrog
Senior Member
Username: solarrog
Post Number: 601
Registered: 03-2002
| | Posted on Saturday, October 17, 2015 - 12:09 am: |
|
I have been thinking about this, if he is opening the primers and not adding fuel and it lights of again I would this its flooded. check the needle and seat, and same as JB check the mixture. When it quits pull the plugs and see if they are wet with fuel. if wet lean the mixture, if they are dry richen the mixture. Good luck with it |
warrene77
Member
Username: warrene77
Post Number: 16
Registered: 04-2013
| | Posted on Saturday, October 17, 2015 - 08:49 am: |
|
Thanks again Gents!
The carb. I'm using works well on my Gray single cylinder "R" so I think fuel level is OK. I'll try choking (full or partial). I'll also try opening the needle valve a good bit more as so far I haven't had it open more than 1 turn. Then I'll have a look at the plugs and lean or richen the mixture.
I worry that the crankcase is not holding compression. If I open a drain and crank the engine by hand I can't feel any air flow but also know that the engine turns much faster when running so the "hand" test may not be accurate.
Though this is frustrating, I enjoy it very much.
These 2 cycle engines fascinate me.
Thanks again - I sure appreciate all suggestions and help!
Warren |
warrene77
Member
Username: warrene77
Post Number: 17
Registered: 04-2013
| | Posted on Sunday, October 18, 2015 - 08:25 pm: |
|
Still no improvement.
Initial start up I choke carb and turn engine over until a little gas drips from throttle plate.
Won't start. Prime, and it will fire a time or two. After several repetitions of that it settles down to the following:
I open priming cups and turn engine over 3 - 4 revolutions. Close the cups (add no fuel) and "bump". Engine starts easily and runs strong but only runs for a few seconds (say 10 revolutions). It will do this many times. I've since tried choking, opening needle, trying various throttle positions. Plugs are almost dry (by no means wet). Now I'll put the carb. back on my Gray "R" and verify carb is OK.
I finally got grease in front main so front and rear mains have new grease. I cannot get grease into the center main. Removed water pump to look at bypass screen. There was no gasket. The screen looks dirty but should not block fuel/air mix. I'll check the front screen tomorrow and then make new gaskets and put things back together.
I've become convinced there is an air leak (or leaks) in the crankcase because the crankcase simply does not suck fuel/air mixture in. SO, I'll build a cradle to hold the engine upside down and examine the bottom. I expect I'll have to remove the crankcase to get that center bearing greased. I sure enjoy this kind of thing and REALLY want to get this beauty running!
Wish me luck....and be sure all advice is most welcome!
Warren |
raa
Senior Member
Username: raa
Post Number: 100
Registered: 02-2007
| | Posted on Sunday, October 18, 2015 - 08:38 pm: |
|
Look for a missing drain plug on the bottom of the crank case |
jb_castagnos
Senior Member
Username: jb_castagnos
Post Number: 1112
Registered: 07-2002
| | Posted on Monday, October 19, 2015 - 12:04 am: |
|
Remove the greaser, install an Allemite grease fitting and use a grease gun to force grease in. Grease provides a seal, but the bearings would have to be worn to allow that much leakage while running. Is the compression good, worn rings allow combustion gasses into the crankcase killin g the incoming charge. |
ernie
Senior Member
Username: ernie
Post Number: 2147
Registered: 01-2002
| | Posted on Monday, October 19, 2015 - 07:19 am: |
|
If this is the engine from Dick D that was sold at the Calvert show a while back it ran good a couple of years ago.
Suggest installing 2 new Motocraft Model T Ford sparkplugs.
Hope this helps
Ernie |
warrene77
Member
Username: warrene77
Post Number: 18
Registered: 04-2013
| | Posted on Monday, October 19, 2015 - 08:38 am: |
|
Thank you Gentlemen,
RAA, I replaced drain plugs with new petcocks before attempting to start.
JB, I replaced greasers with Alemite fittings and I'm VERY surprised that I can't force grease in. I peeked at rings through fuel/air inlet and exhaust outlet and they look good.
Ernie, Yes, I bought this engine from Dick D. at the Calvert show 2013 (I had wanted it for some time!). I'll try to get the Motocraft Model T Ford plugs. (Using New Autolite 3095 plugs now).
My next steps are:
Clean both bypass screens and make new gaskets for the pump and front cover plate. Remove the patch on the bottom of the crankcase and make a new gasket for that. I haven't decided to remove the crankcase yet and will continue to TRY to get grease into that center main bearing with a grease gun before that.
I sincerely appreciate all suggestions and help with this. I look forward to "Looks Good, Starts Easy, Runs Well!".
Thanks again,
Warren |
ernie
Senior Member
Username: ernie
Post Number: 2149
Registered: 01-2002
| | Posted on Monday, October 19, 2015 - 12:10 pm: |
|
Warren,
Autolight 3095 are OK.
The old ones in the pics you posted are for show only |
warrene77
Member
Username: warrene77
Post Number: 19
Registered: 04-2013
| | Posted on Monday, October 19, 2015 - 08:49 pm: |
|
Thanks Ernie.
Today I removed the water pump and fwd. bypass port cover, cleaned all surfaces and made new gaskets. There were no gaskets at either place(?). The screen for the aft bypass was quite dirty (don't know that it was blocking flow of fuel/air) and the fwd bypass had no screen so I ordered some brass screen from McMaster-Carr.
Next will be verify carb. on another engine and see if I can re-seal the patch. I will probably try to start again after I put the screens in and seal the patch. If no-go, then off with the crankcase. I keep hoping that if I get it running and good and hot the center bearing will take some grease!
Thanks again, and all ears for suggestions!
Warren |
warrene77
Member
Username: warrene77
Post Number: 20
Registered: 04-2013
| | Posted on Monday, October 19, 2015 - 09:02 pm: |
|
Note regarding "Transfer Ports":
I've been using "Bypass" when I should be using "Transfer".
I'll try to get it right from now on.
Thanks again,
Warren |
warrene77
Member
Username: warrene77
Post Number: 21
Registered: 04-2013
| | Posted on Tuesday, October 20, 2015 - 08:37 pm: |
|
Hello Gents,
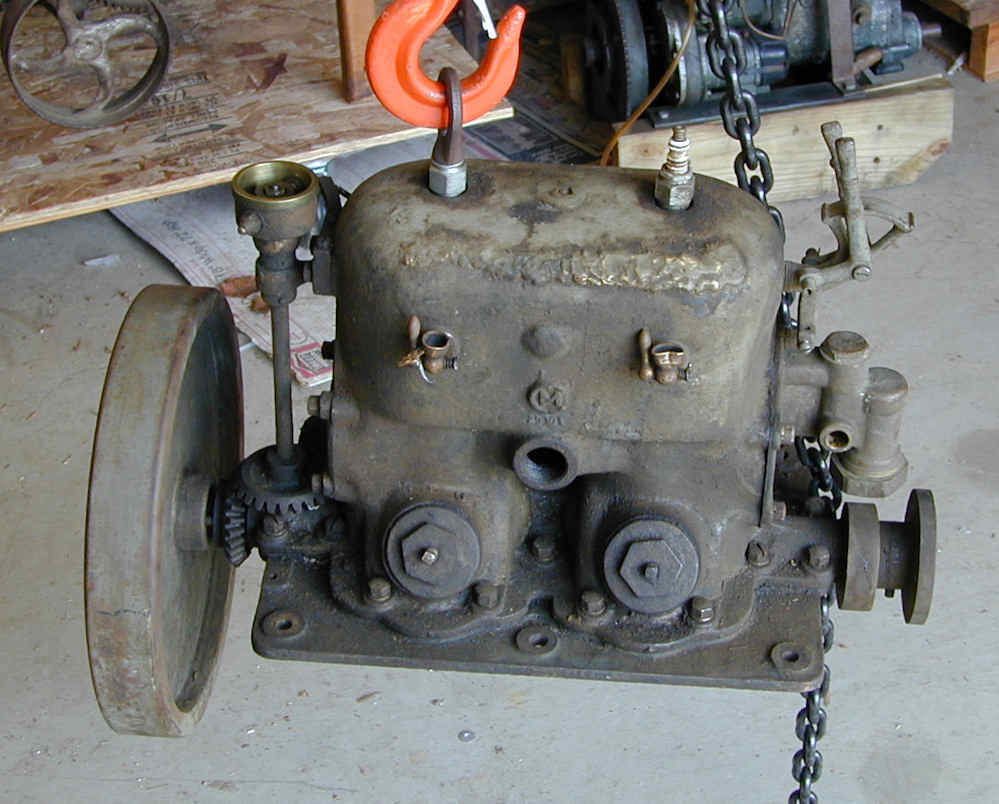
Today I got her turned over. I think I have 2 photos that I can post.
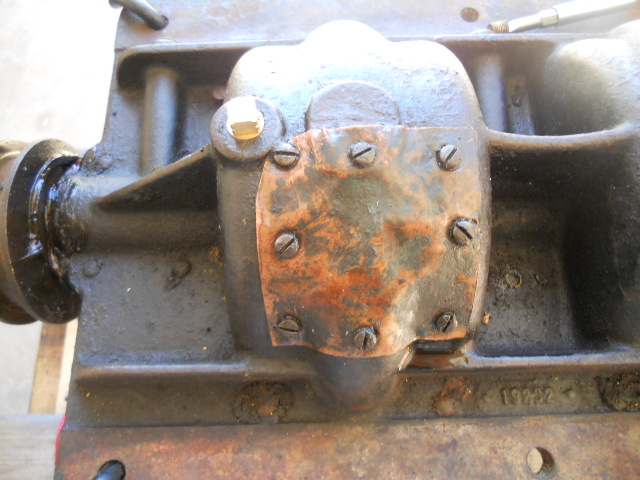
I found auxiliary grease passages which may help with that center bearing.
I want to remove the patch and seal it as that may well be where air is leaking.
I welcome any suggestions regarding how to seal the patch.
Thanks again,
Warren
  |
raa
Senior Member
Username: raa
Post Number: 101
Registered: 02-2007
| | Posted on Tuesday, October 20, 2015 - 08:48 pm: |
|
try applying 20 or 30 psi air to the the crank case and then use soap and water to check for leaks or you might be able to hear your leaks. |
todd_vidgen
Senior Member
Username: todd_vidgen
Post Number: 264
Registered: 03-2008
| | Posted on Tuesday, October 20, 2015 - 11:23 pm: |
|
Looks like it has suffered from an over dose of positive crank case ventilation at some time in the past. |
jb_castagnos
Senior Member
Username: jb_castagnos
Post Number: 1114
Registered: 07-2002
| | Posted on Wednesday, October 21, 2015 - 12:31 am: |
|
If you didn't see fuel around the patch it probably isn't leaking. JB Weld should seal it. Remove the drain plugs and extend out with some 1/4" tubing and put valves on them. After it starts and dies, open the valves and crank it over, see if fuel comes out, it's a good way to purge the case. |
warrene77
Member
Username: warrene77
Post Number: 22
Registered: 04-2013
| | Posted on Thursday, October 22, 2015 - 06:56 pm: |
|
Hello Gents,
The engine definitely appeared to have been running with the patch on it. When I removed the patch I found it to be quite loose and found the remains of cloth under it (cloth appeared to have been used to seal the patch). The copper patch is well fitted to the crankcase contours. I will now replace the patch and seal it with "Permatex MotoSeal 1 Ultimate Gasket Maker Gray". If I can get the engine to run with the patch then I'll consider having the hole repaired by High-Nickel welding as part of a full "high grade" restoration.
I'm all ears for suggestions and advice.
Thanks again,
Warren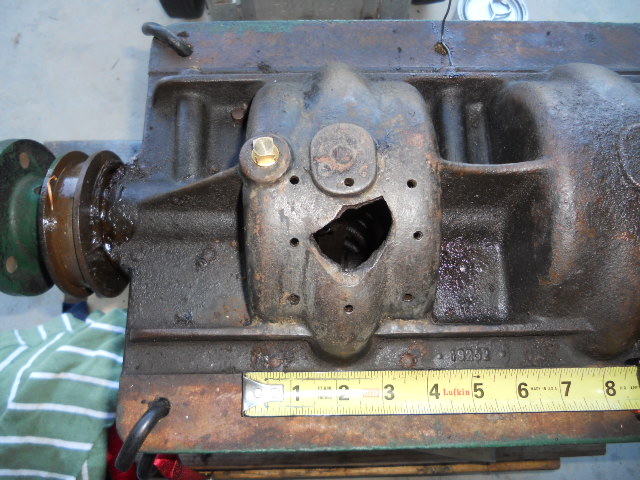 |
warrene77
Member
Username: warrene77
Post Number: 23
Registered: 04-2013
| | Posted on Thursday, October 29, 2015 - 07:05 pm: |
|
Hello Gents,
The patch on the crankcase worked out well - but she still won't pull gas/air and thus still won't run normally.
Engine "wants" to run.
Examples:
Will run from priming.
Ran great after I put a teaspoonful of oil in each cylinder...Smokey, but ran well.
Notes:
When I started removing parts getting ready to turn it upside down, I noticed that the forward transfer port was quite dry and the aft transfer port had evidence of fuel.
STILL can't get grease into center main bearing with a grease gun.
1. I'll put the carb. back on my Gray "R" and double check that carb. works.
2. I'll test the crankcases with a pressure gauge.
3. If it won't hold pressure, off with the crankcase bottom and look for the problem.
All advice and suggestions are most welcome!
Thanks again,
Warren |
brian carey
Visitor
| | Posted on Sunday, July 17, 2016 - 11:20 am: |
|
evening gents have been lucky enough to get a beautifull a buchanan I off ,and a brit sprite from Jersey does anyone have a manual please as am a novice in need of advice,many thanks |
warrene77
Member
Username: warrene77
Post Number: 30
Registered: 04-2013
| | Posted on Sunday, November 19, 2017 - 05:53 pm: |
|
Hello Gents,
It's been a little over 2 years since I have been able to get back to this Gray Flyer. I'm ready to go again and have found a problem. There is a fragment broken off of the top of the #1 piston and I wonder if that has been my problem all along. I will try to attach a drawing of the situation.
Thanks, Warren |
warrene77
Advanced Member
Username: warrene77
Post Number: 31
Registered: 04-2013
| | Posted on Thursday, November 23, 2017 - 05:53 pm: |
|
I've revised my thoughts about the starting problem. I've been trying to bump start with the ignition VERY retarded (hoping to minimize the engine jumping around). Concern about the broken fragment from the piston caused me to take a good look at the exhaust timing compared with the spark timing. I may have had the spark very close to exhaust port opening because of the difference between spark time when bump starting and spark time for normal running (due to timer contact size). |
robert
Senior Member
Username: robert
Post Number: 911
Registered: 07-2003
| | Posted on Sunday, November 26, 2017 - 02:23 pm: |
|
Warren, IMHO you might as well embark on your "high grade restoration" and when you do, you will undoubtedly discover whatever is causing the running problems. These Gray's were very well-engineered and well-built engines for their time. Considering that you have had the conrod bust through that decidedly robust looking crankcase, you might have a variety of problems flowing from that, aside from just the the wear and tear of a century to the rings, pistons and bores.
I would tear it down completely, and take a good look at things, including taking plenty of photos, before cleaning all the parts. Some issues will be best discovered from the dirt, corrosion and wear that is seen before cleaning, some issues are more easily seen after cleaning the parts.
You may have a bent rod, a damaged cap, a scuffed bore...there are lots of possibilities. Of course this incident may have occured back when parts were still available and the rod and cap may have been replaced. It would be worth having the crank properly inspected for runout by at least putting it in a lathe between centers and checking with a dial indicator on a magnetic base.
Was the broken-out piece of the crankcase under the patch or not? I am sure George Coates could repair this for your so you would never know it had been damaged at all. Have a look at his work elsewhere on this forum. |
miro
Senior Member
Username: miro
Post Number: 941
Registered: 11-2001

| | Posted on Saturday, December 02, 2017 - 06:13 pm: |
|
When I first got the 2 cylinder St Lawrence in the boat and in the water, I had trouble doing the bump start.
I eventually found that I had the timer set WAAAAY after TDC, , so it would fire on the bump, come back and fire once or twice and then quit.
Setting the timer closer to TDC on that engine (10 degrees after TDC)) let me bump it, and then it would fire and run.
But it didn't run well.
I then found it ran much better in the other direction.
I discovered this by experiment ( accident ? ?) and I eventually replaced the right hand prop with a left hand prop.
I have a piston water pump so it works well.
Your gear pump should tell you the proper direction.
At a show with closed circulation cooling, the gear pump will work well enough in either direction, but in a boat, the gear pump will only work in one direction of rotation.
miro |